Welcome
Thanks for picking up FilterKit Pro. This page walks you through setup and every feature. Most stores are up and running in under 5 minutes because the setup wizard handles the configuration for you.
If you like to jump in: activate the plugin, enter your license key, and let the wizard do its thing. Come back here when you need to look up a specific feature or fix something.
What Makes This Plugin Special?
Most filter plugins only do one thing: add dropdowns or checkboxes to your shop page. If you want analytics, search, product comparison, waitlists, infinite scroll, or SEO-friendly URLs, you'd normally need to buy and maintain several separate plugins. FilterKit Pro puts all of that into one plugin, so everything works together and you only have one thing to configure.
9 Filter Types + Instant Updates
Color swatches, image tiles, price sliders, checkboxes, radio buttons, dropdowns, star ratings, toggles, and category trees. Products update instantly with no page reloads.
Smart Search Bar
Customers type "red leather jacket under $200 in medium" and the plugin works out color, material, category, price, and size. Also handles typos.
Analytics + Revenue Tracking
A 7-tab dashboard that shows which filters drive sales, what customers can't find, and plain English suggestions for boosting revenue.
Variation-Aware Filtering
Checks actual product variations. If Red + XL doesn't exist, it doesn't show up. Customers only see products they can actually buy.
Zero Results Recovery
When filters return nothing, customers see close matches, alternative suggestions, and a "Notify Me" form instead of a blank page.
Product Comparison
Customers pick 2 to 8 products and compare them side by side: price, attributes, rating, stock. A "Show only differences" toggle is included.
SEO & Clean URLs
Ugly filter URLs turn into clean paths like /shop/color-red/size-large/. Page titles, descriptions, and a sitemap are generated for Google.
Mobile Bottom Sheet
On phones, filters slide up from the bottom in a touch-friendly panel like Google Maps. Bigger tap targets, sticky apply bar, live product count.
Email Reports & Alerts
Weekly digest with revenue, top filters, and gaps. Instant alerts when zero-result searches hit your threshold. Uses your store branding.
Installation & Setup
After purchase you get a .zip file and a license key. Here is the full process from start to finish:
Install & Activate
In your WordPress admin go to Plugins, Add New, Upload Plugin. Choose the FilterKit Pro .zip file, click Install Now, then click Activate.
Enter Your License Key
Right after activation you will see a license activation screen. Paste the license key from your purchase email and click Activate. This unlocks the plugin and turns on automatic updates.

The license activation screen shows up right after you activate the plugin.
Setup Wizard Runs Automatically
Once the license is active, the setup wizard launches. It scans your store and works out the right filter setup for your products, so you do not have to configure anything manually.
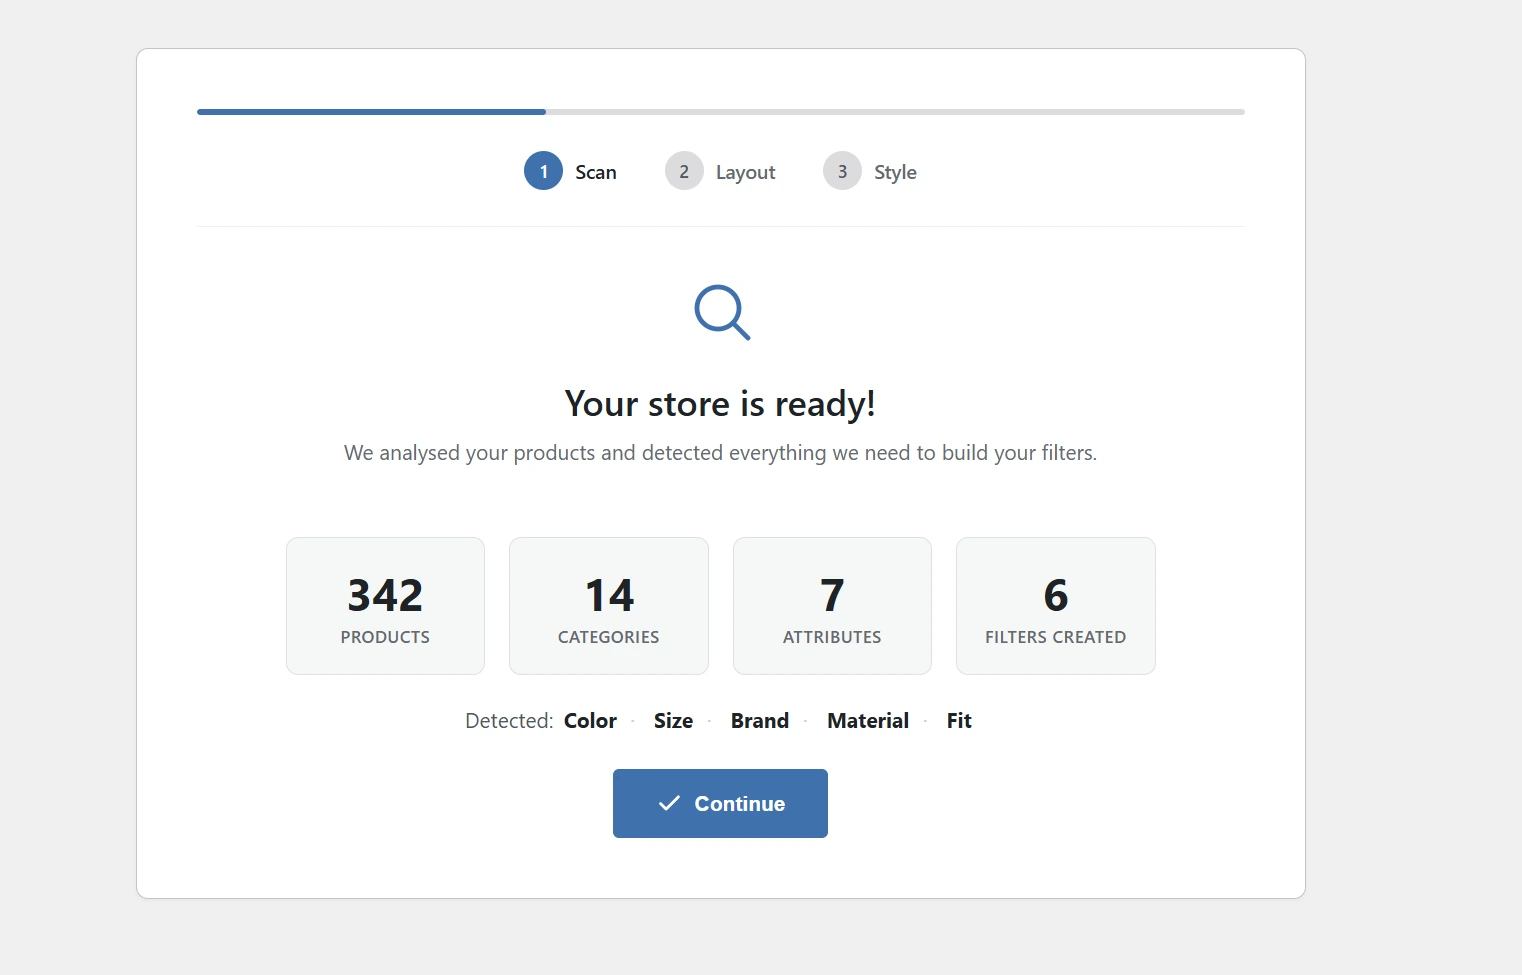
The wizard detects your product attributes, categories, price range, theme, and page builder.
- Your product attributes (Color, Size, Brand, Material, etc.) and their values
- Your product categories and subcategories, with product counts
- The cheapest and most expensive products (for the price slider)
- Which page builder you're using (Elementor, Divi, Bricks, Breakdance, Beaver Builder, Oxygen, WPBakery, or the default WordPress editor)
- Your active theme. Compatibility settings are applied for Astra, Flatsome, WoodMart, Kadence, and 5 more popular themes.
- Whether your products have size or color variations (turns on variation-aware filtering if they do)
Review & Customize
The wizard picks a filter type for each attribute: color swatches for Color, checkboxes for Brand, a price slider for price, star ratings for reviews. You can drag to reorder, change any filter type, then hit Save.

Drag filters to reorder. Change filter types with one click. Hit Save when you are done.
You Are Live
Filters are on your shop page, the search bar works, and analytics have started collecting data. Visit your shop to see it in action. The whole thing usually takes under 5 minutes.
- WooCommerce, FilterKit Pro: Your dashboard. Manage filters, reorder them, change types, edit labels.
- WooCommerce, FilterKit Analytics: Your analytics dashboard with 7 tabs of customer data.
- WooCommerce , Settings , FilterKit Pro: All your settings: General, SEO & URLs, Features, Comparison, Advanced, and License.
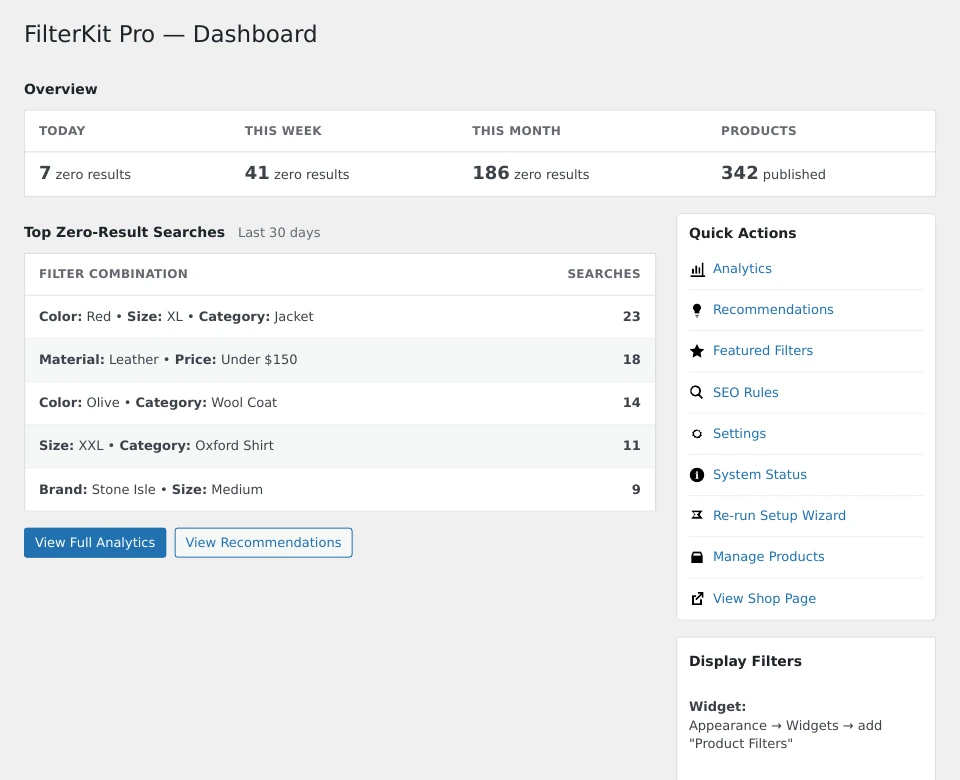
The FilterKit Pro dashboard is where you manage everything.
The 9 Filter Types
Each filter type is built for a specific kind of product attribute. The wizard picks the right one automatically, but you can change any filter type in WooCommerce, FilterKit Pro.

Color swatches, checkboxes, price slider, and star ratings working together on a shop page.
- Color Swatches: Round clickable color circles. The plugin reads the color code from your WooCommerce attribute, if you have a "Red" term with color #ef4444, it shows a red circle. Best for Color attributes.
- Image Swatches: Square thumbnail tiles. Upload an image for each option. Great for materials (leather, cotton), patterns (stripes, plaid), or anything where a picture says more than a word.
- Price Slider: Two draggable handles on a bar. The plugin reads your cheapest and most expensive products automatically. Customers drag to set their budget and see numbers update in real time.
- Checkboxes: Pick as many as you want. Each option shows how many products match. Best for categories, brands, tags, anything where customers want multiple selections.
- Radio Buttons: Pick only one. Good for either-or choices like Gender (Men / Women / Kids) or Condition (New / Used / Refurbished).
- Searchable Dropdown: A dropdown with a search box at the top. Perfect when you have lots of options, like a Brand filter with 50+ brands.
- Star Rating: Filter by customer review rating. Shows stars (5 stars, 4 stars, etc.) with how many products match each level. Requires WooCommerce reviews to be enabled.
- Toggle Switch: A simple on/off switch. Perfect for "On Sale," "In Stock," "Free Shipping," or "Featured." Takes very little sidebar space.
- Category Tree: An expandable list showing your category hierarchy. Click the arrow to see subcategories. Drill down without leaving the page.
A built-in sort dropdown lets customers sort by price (low/high), popularity, average rating, newest, or alphabetical. It appears alongside your filters automatically.
If a filter has 50+ options, you can keep it manageable. Set these per filter in WooCommerce, FilterKit Pro , click on any filter , Overflow Settings:
- Scrollable Container: Set a max height and the list scrolls within it
- Search Within Filter: Adds a small search box at the top of that filter
- "Show More" Toggle: Shows the first few, then a "Show 47 more" link to expand
- All Three Combined: Use all three together for the best experience
Matrix View
Matrix View is a special filter that shows two attributes together in a grid, like Size across the top and Color down the side. Customers can see at a glance which combinations are available and which are sold out. Especially useful for clothing, shoes, and accessories stores.
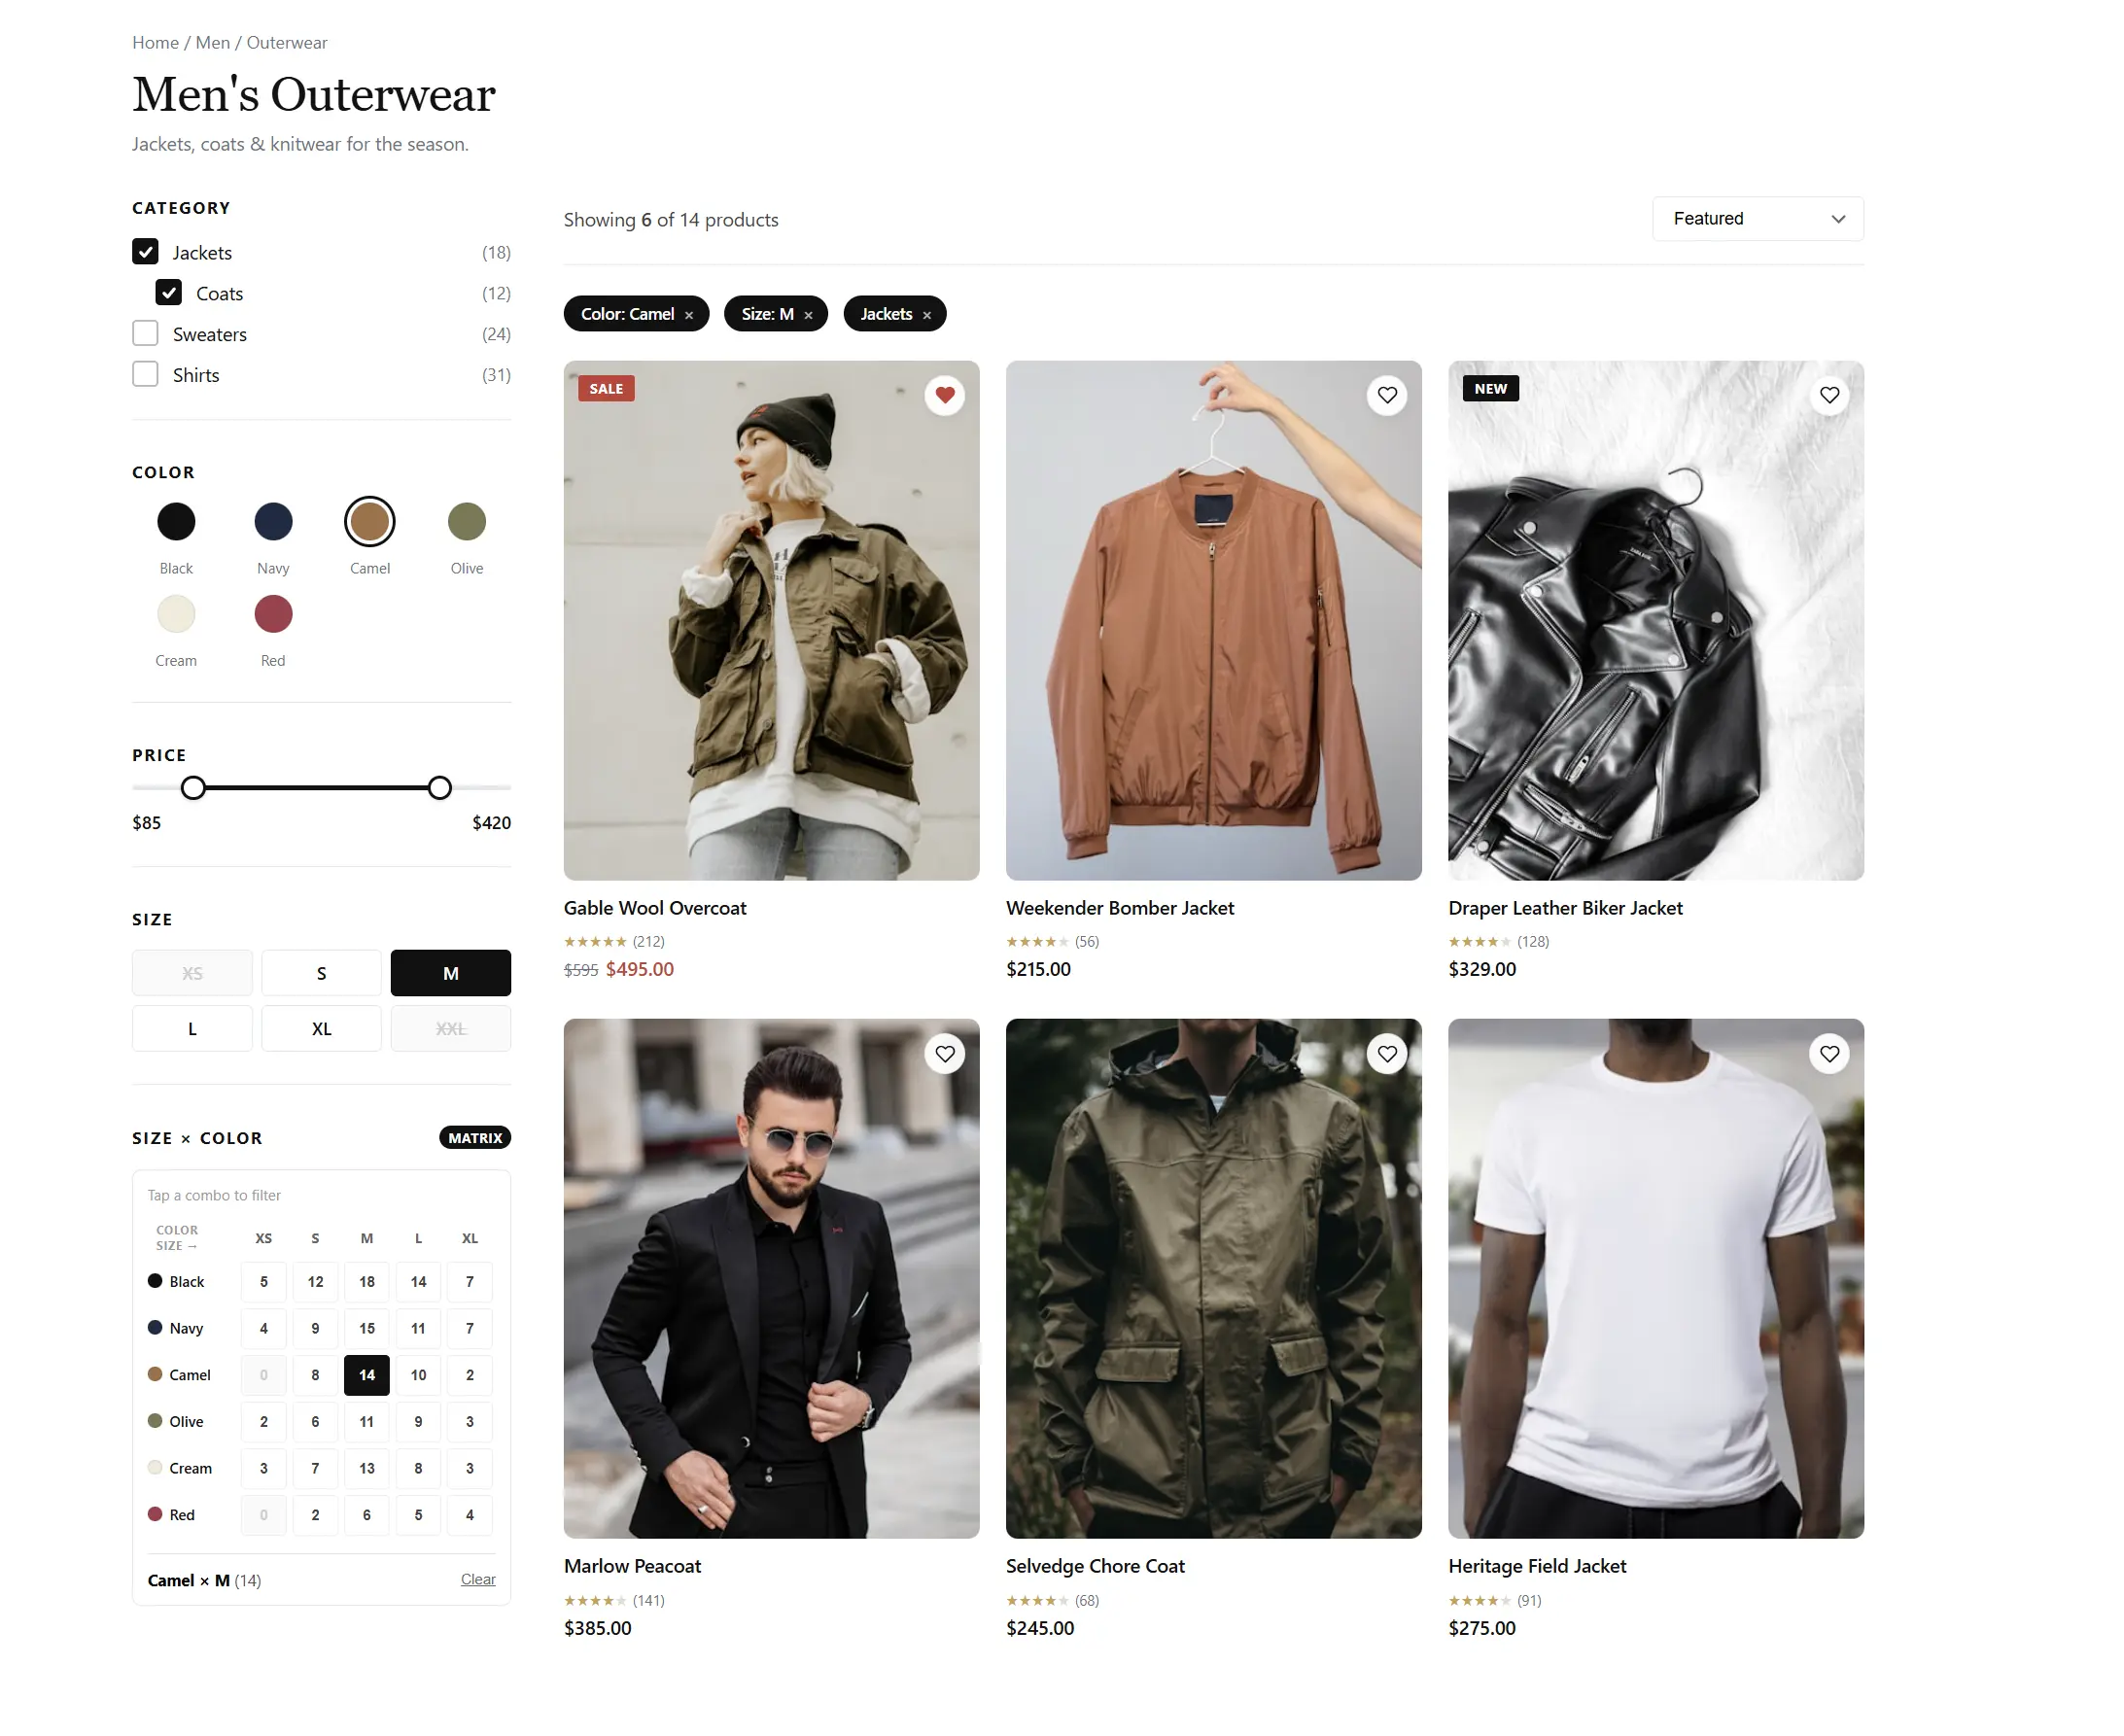
A Size × Color matrix. Available combinations are highlighted, sold-out ones are dimmed.
Choose the look that matches your store: Default, Editorial, Soft, Dots, Bold, Pills, or Heatmap (uses color intensity to show stock levels).
Use the shortcode anywhere on your site:
[filterkit_matrix_filter]Displays the matrix grid. Availability is checked in real time, so customers never see combinations they can't buy.
Shortcodes & Gutenberg Blocks
The setup wizard places filters on your shop page automatically. But if you want them somewhere specific, a custom page, a sidebar widget, or a page builder layout, use shortcodes or blocks.
Copy and paste these into any page, post, or widget area:
[filterkit_filters]Shows the full filter sidebar.[filterkit_filtered_products]Shows the product grid that updates when filters are used. Pair with the sidebar shortcode for a custom shop layout.[filterkit_active_filters]Shows the active filter chips, little tags like "Color: Red ×" that customers can click to remove. Place above your product grid.[filterkit_search_bar]Shows the smart search bar. Put it in your header, above the shop, or anywhere else.[filterkit_sort]Shows a standalone sort dropdown. Useful when you want sorting placed separately from filters.[filterkit_matrix_filter]Shows the Size × Color matrix grid.
If you use the WordPress block editor, search for "FilterKit" in the block inserter. Four blocks are available:
- Product Filter Sidebar: Same as the filter shortcode, with a live preview in the editor.
- Filtered Products Grid: The product grid. Preview updates as you change settings.
- Active Filter Chips: The active filter tag bar.
- Smart Product Search: The smart search bar block.
All four blocks work with Full Site Editing (FSE), place them in your theme's shop template, archive template, or any custom template.
If you use Elementor, Divi, Bricks, or another supported page builder, FilterKit Pro has native drag-and-drop widgets for each. Look for "FilterKit" in your builder's widget panel.
Smart Search Bar
The search bar does two things, and they work together:
When a customer types a keyword like "jacket," matching products appear instantly in a dropdown, no page reload needed.
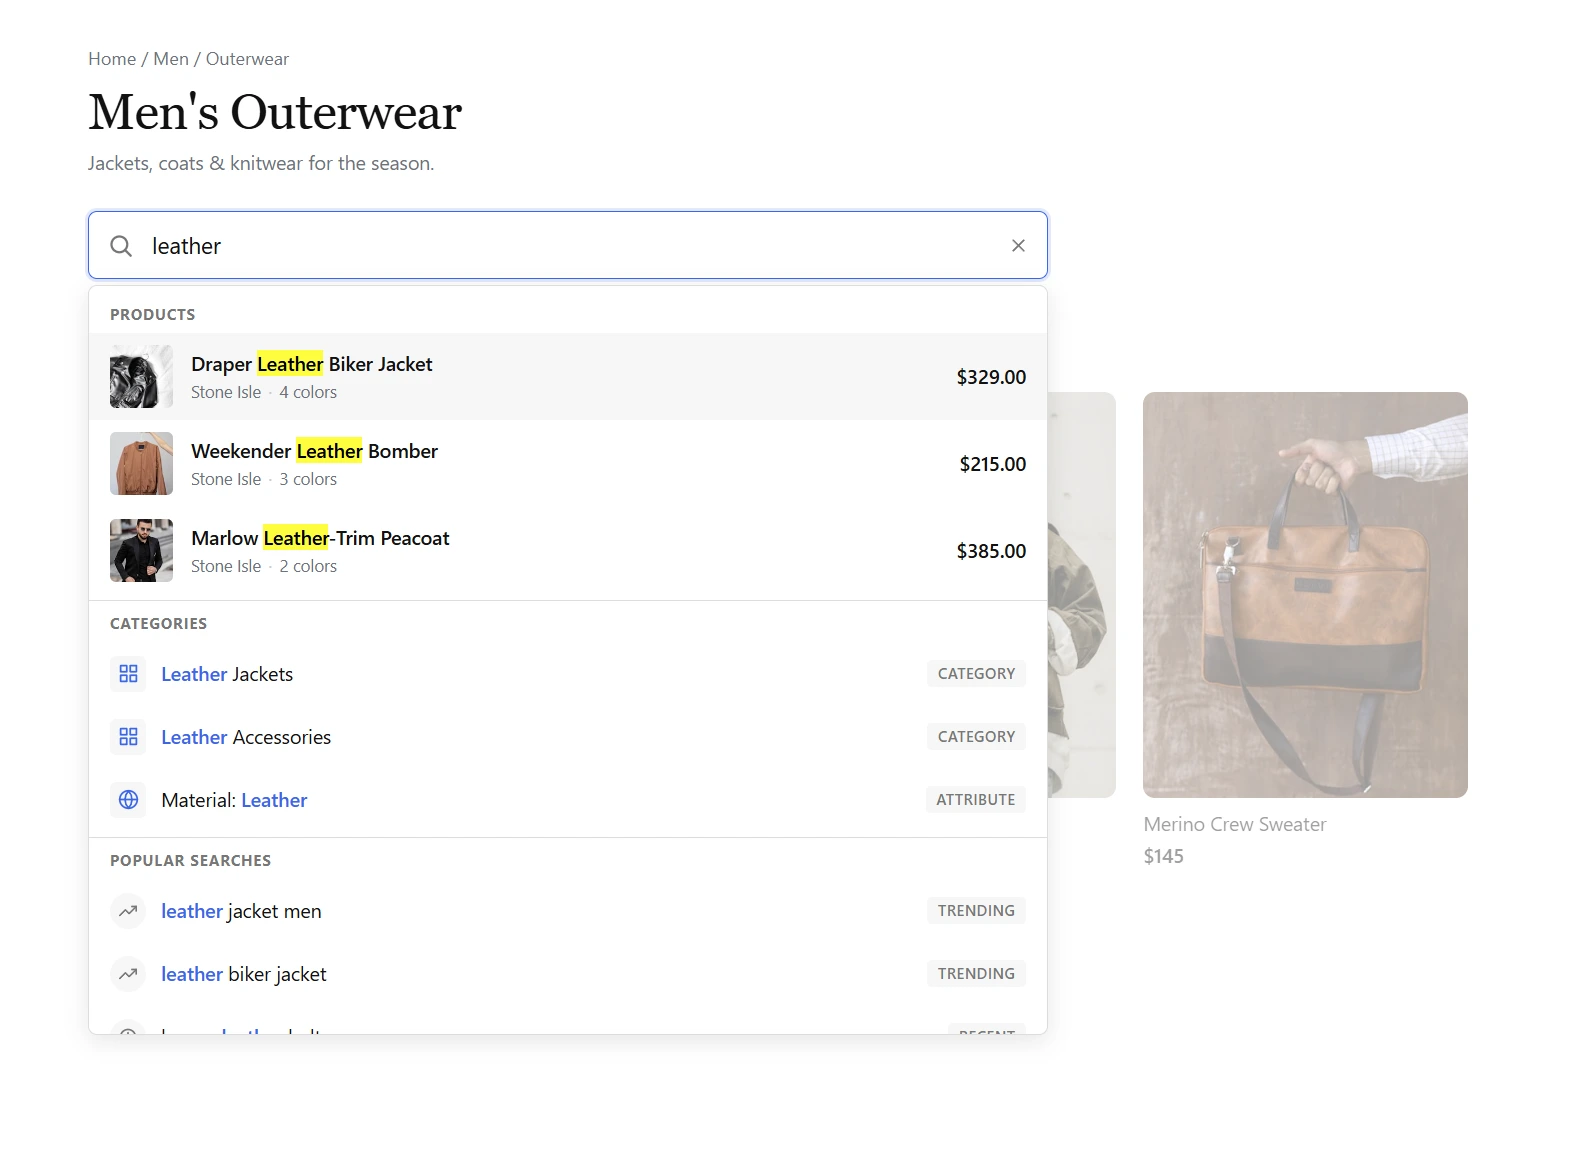
Products appear instantly as the customer types.
Customers can type full sentences like "red leather jacket under $200 in medium" and the search bar understands what they mean:
- Color , Red
- Material , Leather
- Category , Jacket
- Price , Under $200
- Size , Medium
Filters activate automatically and the product grid updates. It also handles typos. "blek jacket" still matches "black jacket."
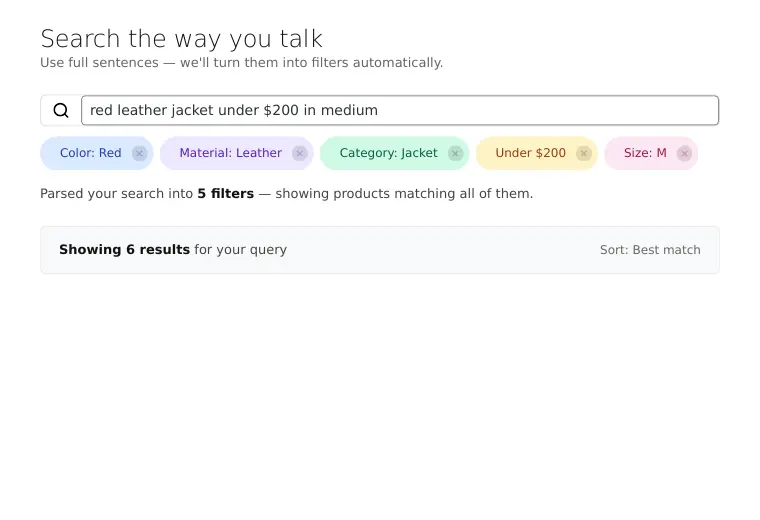
A natural language query parsed into filters automatically.
The search builds an index of your product attributes on activation. If you add new attributes or terms later, go to WooCommerce, Settings, FilterKit Pro, General and click "Rebuild Index" so it recognizes the new terms.
The search runs entirely on your server. No external services, no per-search fees, and no customer data leaving your store. Turn it on or off in WooCommerce, Settings, FilterKit Pro, Features.
Analytics Dashboard
Go to WooCommerce, FilterKit Analytics to see your data. Analytics start collecting automatically when the plugin is activated. Give it 24 to 48 hours of real customer traffic to build up useful numbers.
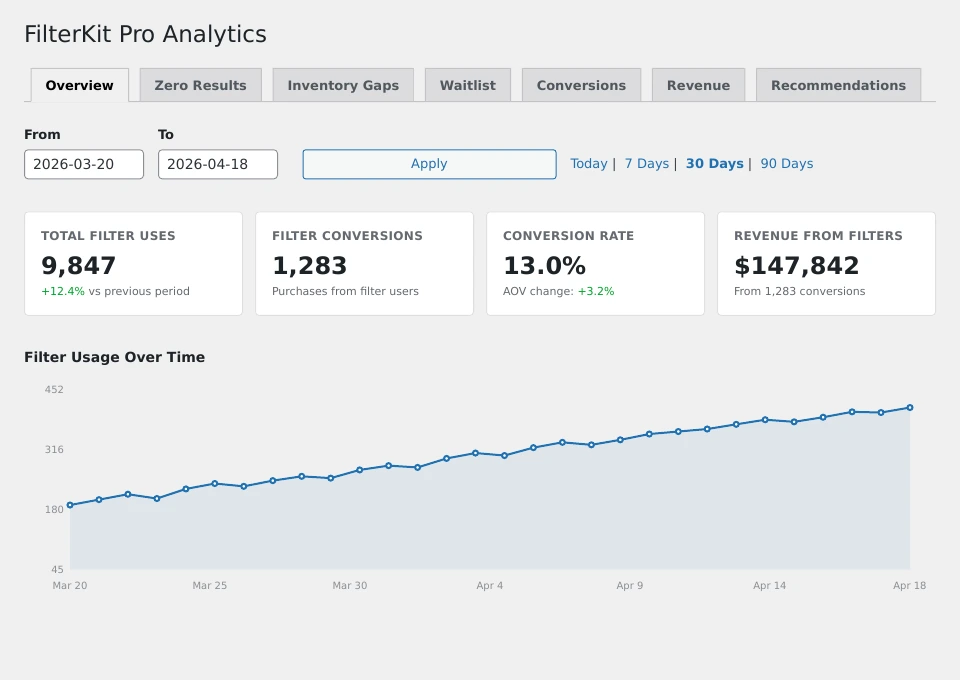
The Overview tab. Your headline numbers at a glance.
The dashboard has 7 tabs:
Three key numbers: how many times filters were used, what percentage of filter users ended up buying something, and how much revenue came from filter users. Below that, a usage trend chart and a list of your most popular filters.
Every search and filter combination that returned zero products, sorted by frequency. This shows you what customers want that you do not have. Example: "23 people searched for 'wireless earbuds under $30', 0 results."
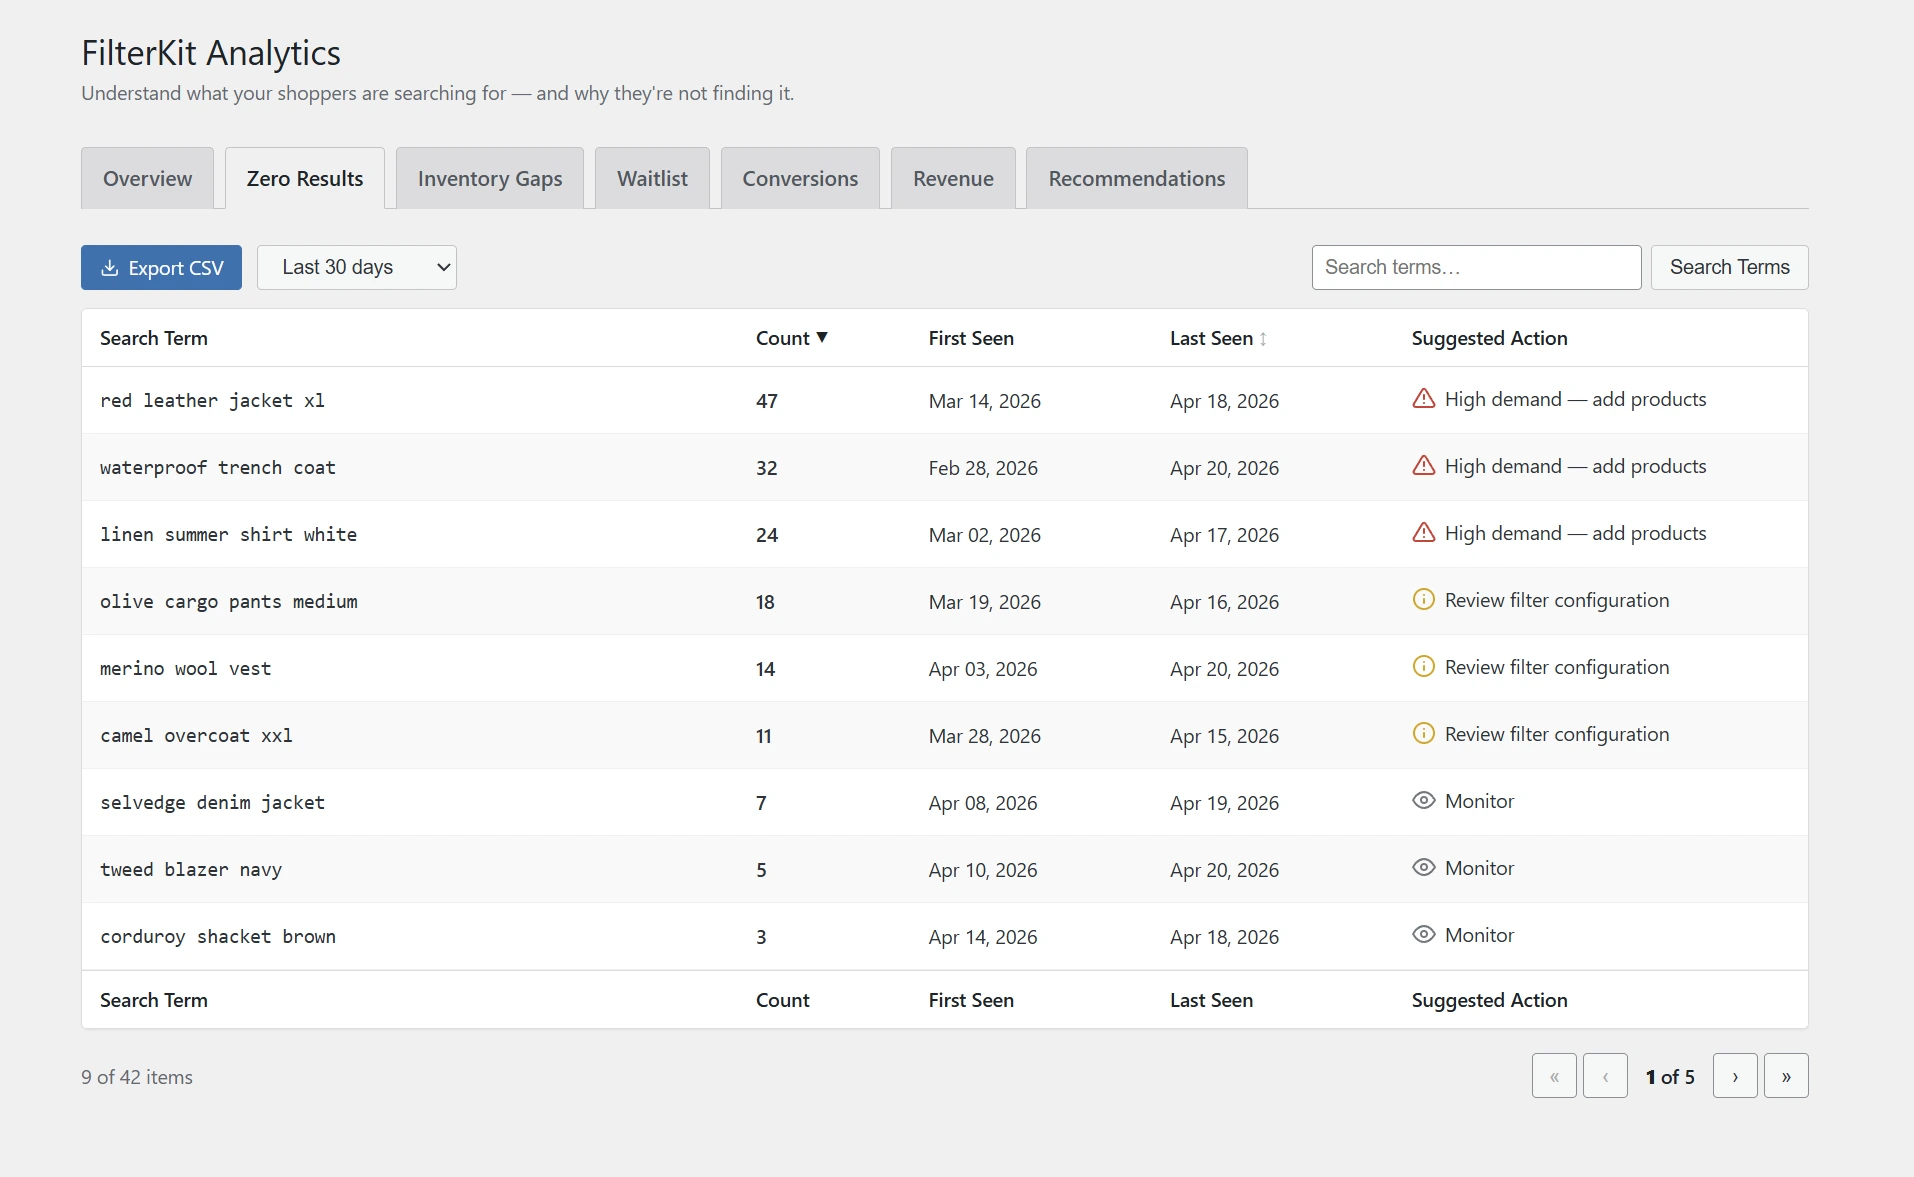
See exactly what your customers are looking for but can't find.
Similar to Zero Results, but focused on filter combinations. If 15 people tried "Red + XL + Jacket" and got nothing, this tab surfaces that. It groups similar searches together, shows week-over-week trends, and suggests similar products you already stock. You can create a draft product from any gap with one click, or export the full table as a CSV file.
Every customer who left their email on a zero-results page. Shows their email, what they wanted, when they signed up, and whether they've been notified.
The full journey: filter clicked , product viewed , added to cart , purchase completed. See which filter paths lead to sales and which are dead ends.

Track the full journey from filter click to purchase.
How much money each filter helped generate. If Color brought in $2,840 and Size brought in $1,920, you know Color is more valuable and deserves a more prominent position.
Plain English suggestions based on your data. Things like: "Move the Brand filter up, it is your 3rd highest earner." Or: "43 customers searched for 'Organic', consider adding it as an attribute." Or: "14 people waiting for Red XL Jackets, consider restocking."

Real recommendations based on your store data, not generic advice.
Every tab has an Export CSV button. Click it and the download starts immediately. Useful for sharing with your team or analyzing in a spreadsheet.
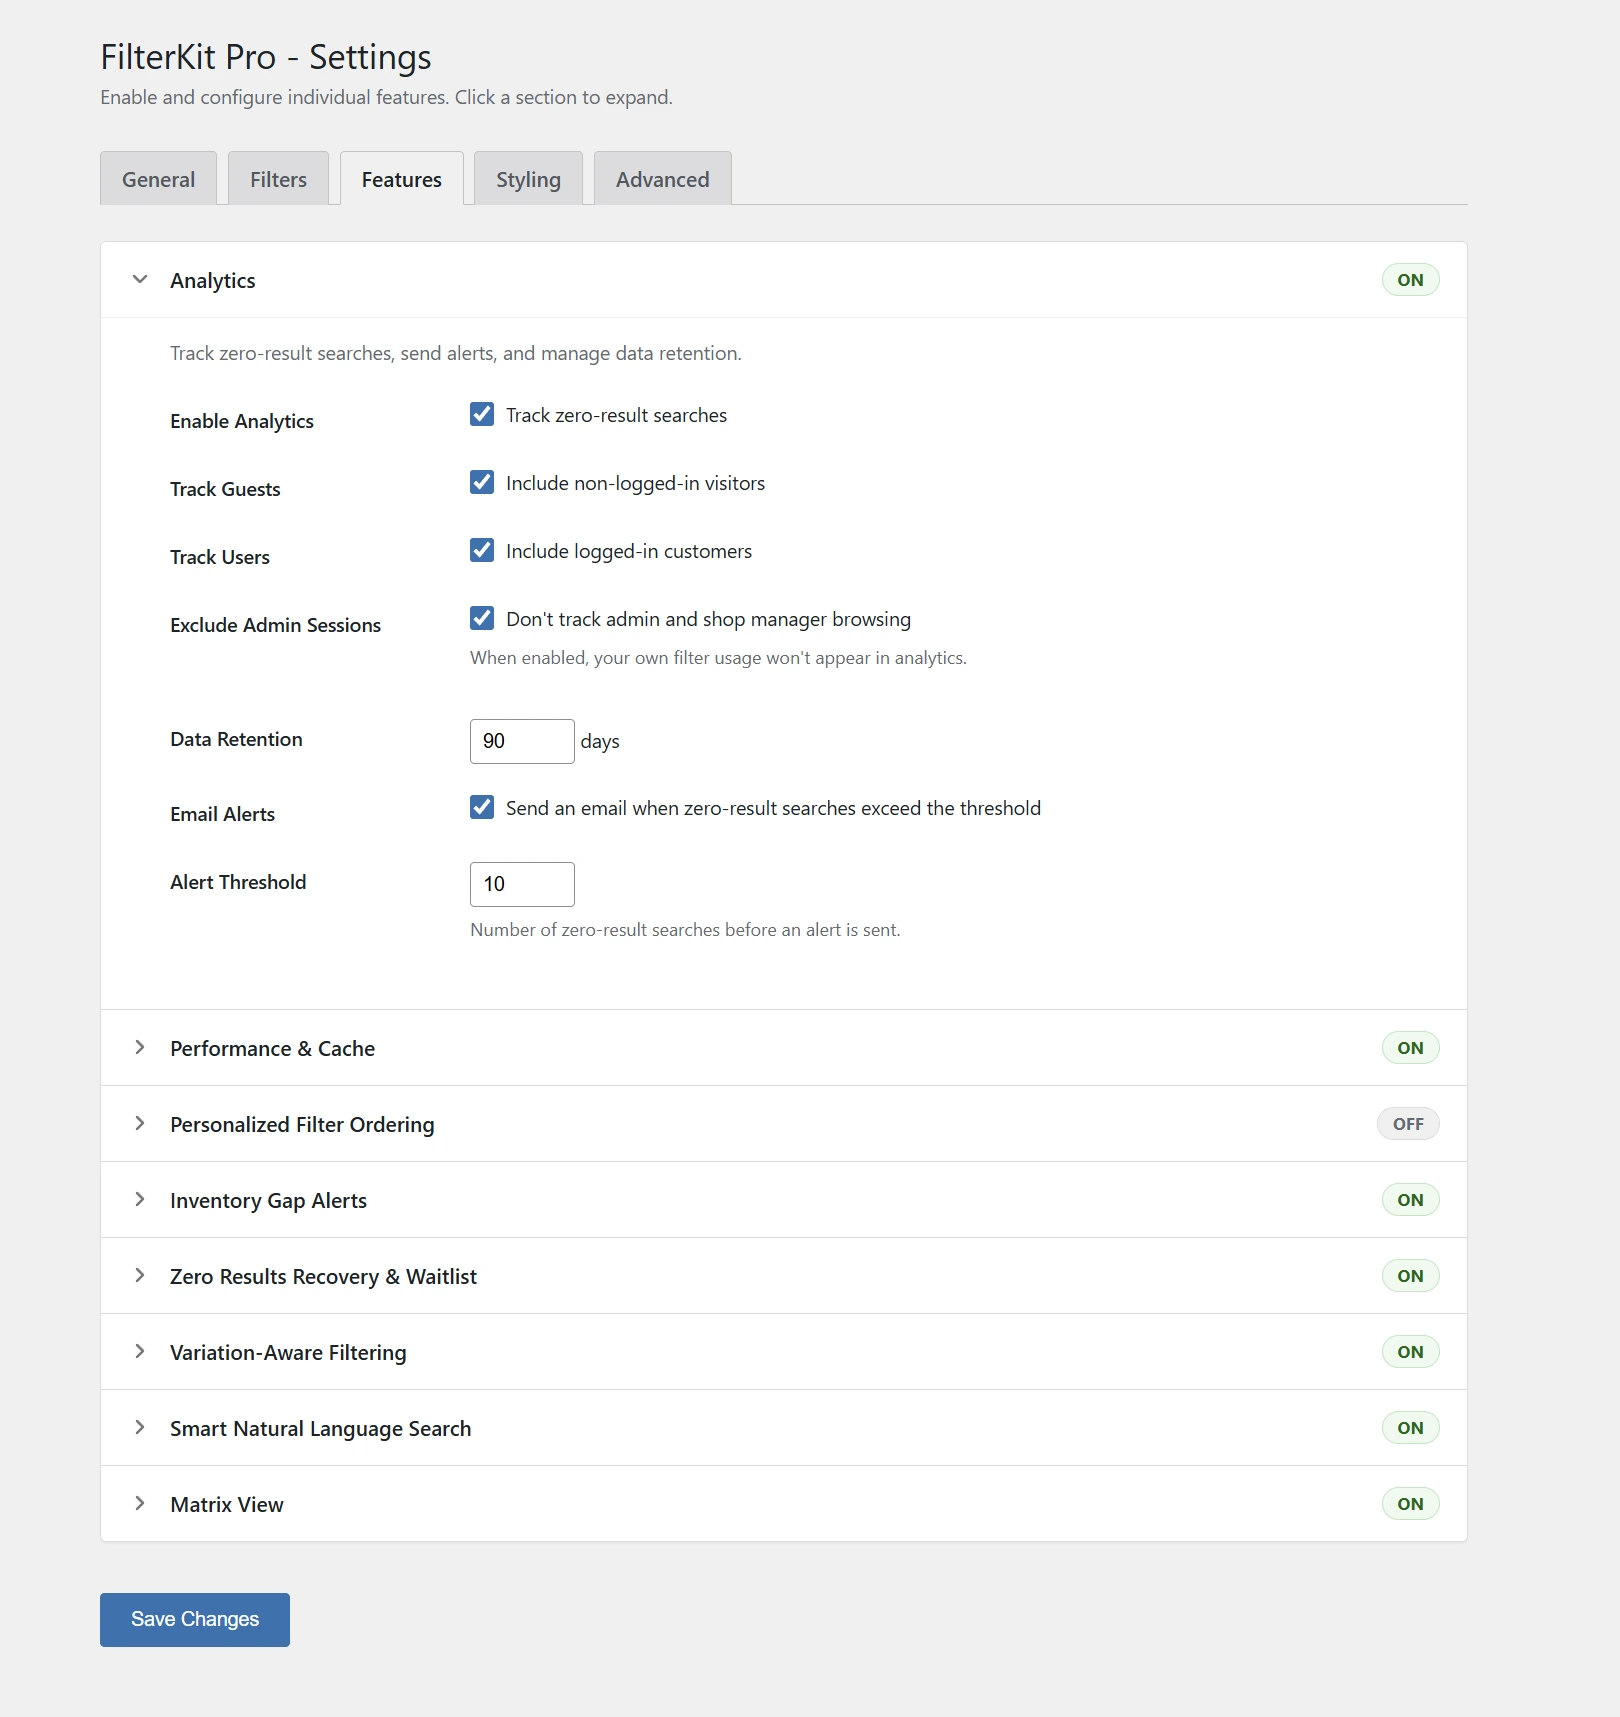
Fine-tune how analytics work in WooCommerce, Settings, FilterKit Pro, Features:
- Data Retention: Choose how many days of data to keep (7 to 365 days). Older data is automatically deleted. Important for privacy compliance.
- Exclude Admin Sessions: Turn this on so your own browsing doesn't appear in analytics. Recommended.
- Track Guests / Track Users: Choose whether to track non-logged-in visitors, logged-in customers, or both.
Display Rules
By default, every filter shows on every page. Display Rules let you control which filters show up where. Set them per filter. Go to WooCommerce, FilterKit Pro, click on any filter, and open the Display Rules panel.

Set display rules per filter: categories, devices, and conditions.
Show a filter only on specific categories. "Brand" only on Electronics, "Size" only on Clothing, "Storage" only on Phones. Each category page gets only the relevant filters.
Show on desktop, mobile, or both. Most stores show 6 to 8 filters on desktop and 2 to 3 on mobile to keep things clean on small screens.
Make filters depend on each other. Hide "Sub-Category" until the customer picks a main "Category." Hide "Size" until they select "Clothing." Keeps the sidebar short until the customer starts narrowing down.
If only 2 products in a category have a "Material" attribute, showing a Material filter there is pointless. Set a minimum (say, 5) and the filter hides itself automatically on pages with too few matching products.
Variation-Aware Filtering
This is one of the most important features if your store sells variable products, products with size and color combinations.
Without this, filtering by "Red" + "XL" shows every product that comes in Red and every product that comes in XL. But it does not check whether Red + XL exists as a real combination. Customers see results, click a product, and get "Sorry, this combination is unavailable." Frustrating. They leave.
With variation-aware filtering, the plugin checks your actual product variations. If a product does not come in Red + XL, it will not show up in results. Customers only see products they can actually buy.
Turn it on in WooCommerce, Settings, FilterKit Pro, Features , Variation-Aware Filtering. If you have 10,000+ variations and filtering feels slow, also enable the Variation Cache in WooCommerce, Settings, FilterKit Pro, Advanced.
Zero Results Recovery
When filters return zero products, most stores show "No products found." The customer leaves. FilterKit Pro does three things instead:

Close matches, alternative suggestions, and a "Notify Me" form instead of a blank page.
Shows Close Matches
Loosens one filter at a time to find nearby products. "Red XL Jacket" returns nothing? It tries "Red Large Jacket" and "Blue XL Jacket" with a note explaining the difference.
Suggests Alternatives
Clickable buttons linking to filter combinations with actual results: "Red + Large, 8 products" or "Blue + XL, 5 products".
"Notify Me" Email Capture
A form for leaving an email address. When you restock what they wanted, the plugin sends them an email with a direct link to buy. All automatic, no manual work.
All three are on by default. Toggle individually and customize in WooCommerce, Settings, FilterKit Pro, Features.
SEO & Clean URLs
On most WooCommerce stores, filter URLs turn into long ugly strings that search engines ignore. FilterKit Pro rewrites them into clean, readable paths that Google can actually find and show in search results:
- Before:
yourstore.com/shop/?filter_color=red&filter_size=large&min_price=50&max_price=200 - After:
yourstore.com/shop/color-red/size-large/under-200/

Clean URLs that customers can bookmark and search engines can index.
- Creates proper page titles for each filtered page (e.g. "Red Large Jackets, YourStore" in Google results)
- Generates page descriptions that summarize the filtered products
- Prevents duplicate content, so Google does not see your shop as 500 identical pages
- Creates a sitemap of popular filter combinations so Google finds and indexes them
Result: someone Googling "red large jackets" could land directly on your filtered shop page. Configure in WooCommerce, Settings, FilterKit Pro, SEO & URLs.
Email Reports & Alerts
You do not need to log into the dashboard every day. FilterKit Pro sends the important numbers to your inbox automatically.
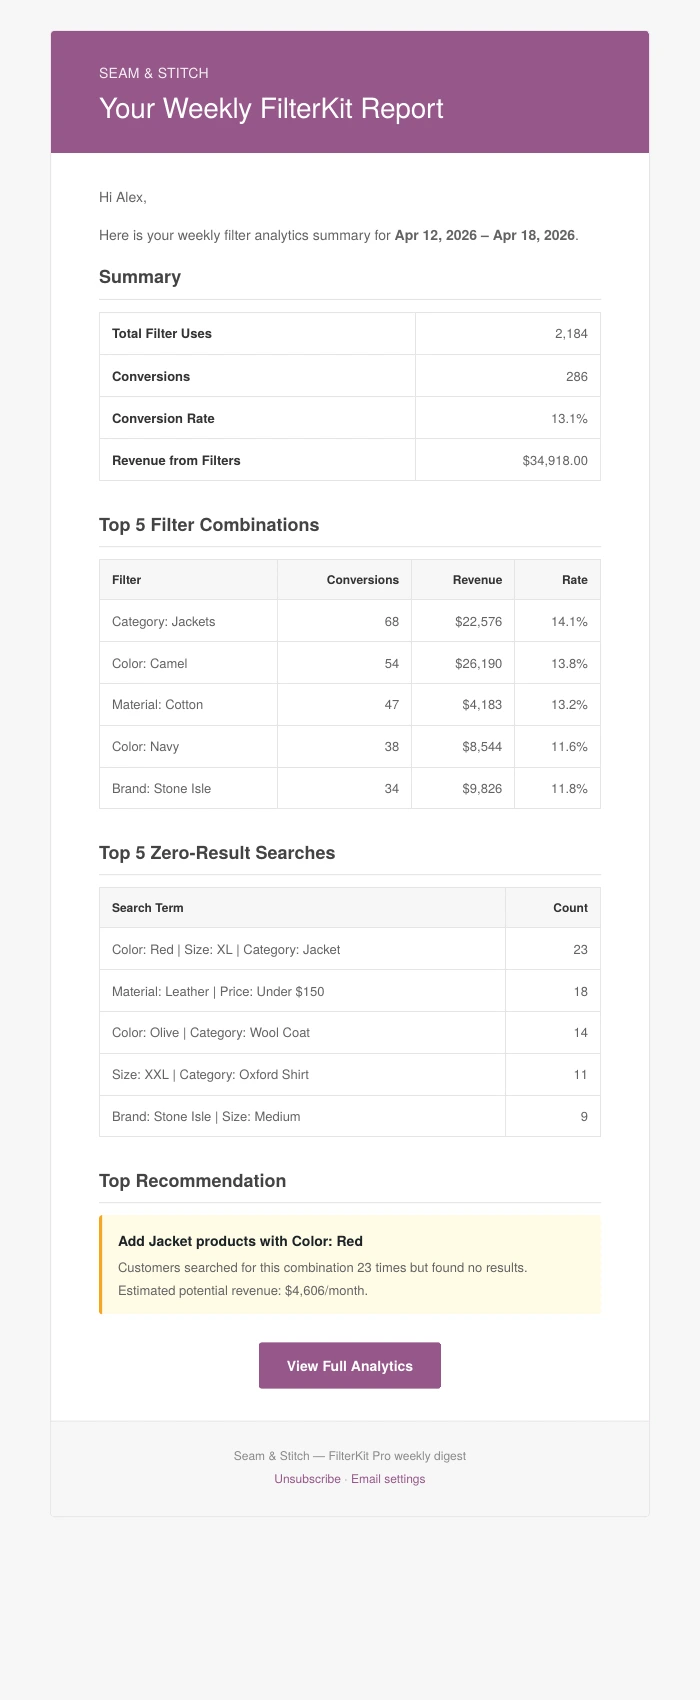
The email uses your store branding: logo, colors, header, and footer.
- Headline numbers (filter uses, conversion rate, and revenue) with changes vs. last period
- What customers searched for that you do not stock
- Top filters ranked by revenue
- New waitlist signups
- Actionable recommendations
Get notified when a search hits a threshold. For example, if 10 people search for something you don't stock in a single day, you can get an alert immediately, as a daily digest, or weekly. Set the threshold and frequency in WooCommerce, Settings, FilterKit Pro, Features.
Both use WooCommerce's email system, so they automatically match your store's branding. Configure recipients and frequency in WooCommerce, Settings, Emails, FilterKit Pro Reports.
Mobile Experience
FilterKit Pro is fully responsive and built for touch screens. On phones, filters work differently to make the best use of small screens:
- Filter Button: A "Filters" button at the top of the shop (e.g., "Filters (3)") replaces the sidebar.
- Bottom Sheet: Tapping opens a panel that slides up from the bottom, like Google Maps or iPhone apps. Swipe down to close.
- Touch Optimized: Larger color swatches, touch-drag price slider, bigger tap areas for checkboxes.
- Sticky Apply Bar: A fixed bar at the bottom shows "Show X products" and "Clear all" with a real-time product count.

A "Filters" button replaces the sidebar on mobile. The number shows active filters.
Use Display Rules to control which filters appear on mobile (WooCommerce, FilterKit Pro , click any filter , Display Rules). Most stores show 2 to 3 on phones vs. 6 to 8 on desktop.
Product Comparison
Customers can pick 2 to 8 products and compare them side by side. No separate plugin needed.

Products compared side by side with price, attributes, rating, and Add to Cart.
- A "Compare" checkbox shows up on each product card in your shop
- Check 2 to 8 products to compare
- A sticky bar at the bottom shows selected products
- Click "Compare" for a full side-by-side table: price, attributes, rating, stock, description
- "Show only differences" toggle highlights where products differ
- Each product has an "Add to Cart" button in the comparison
Turn it on in WooCommerce, Settings, FilterKit Pro, Comparison. Choose which attributes appear and set the maximum number of products (2 to 8).
Personalization
FilterKit Pro learns which filters each visitor uses most and reorders the sidebar to put their favorites first.
- Logged-in customers: Preferences saved in their account. Works across devices.
- Guest visitors: Uses a small browser cookie. No personal data stored on your server. Cookie duration is configurable (default: 30 days).
- What changes: Only the order of filters. If someone uses Color and Brand more than Size and Rating, those move up. Options and behavior stay the same.
Turn it on in WooCommerce, Settings, FilterKit Pro, Features, Personalized Filter Ordering. You can set the minimum visits before it kicks in (default 3), cookie duration, turn on geo-based size defaults (US sizes for US visitors, EU for Europe), and reset data for all users.
More Built-In Features
Every feature has its own on/off switch in WooCommerce, Settings, FilterKit Pro, Features. Features you turn off add zero weight to your pages.
Every feature has its own toggle. Only what you use gets loaded.
- Saved Filters: Logged-in customers can save up to 10 filter combinations and reload them from their My Account page. Great for wholesale buyers who reorder the same categories.
- Load More / Infinite Scroll: Replace "Page 1, 2, 3" pagination with a "Load More" button or automatic scrolling. Resets properly when filters change.
- Bulk Add to Cart: For B2B/wholesale stores. Check multiple products, set quantities, add everything to cart in one click.
- Multilingual Support: Works with WPML and Polylang. Right-to-left (RTL) stylesheet included for Arabic, Hebrew, etc.
- Multi-Currency Support: Works with 5 popular currency switcher plugins. Price slider auto-adjusts to the visitor's currency.
- HPOS & Blocks Compatible: Fully works with WooCommerce's new High-Performance Order Storage and the new Cart & Checkout Blocks. No configuration needed.
Performance & Speed
FilterKit Pro is fast out of the box. Most stores will not need to touch these settings. But if you have 5,000 or more products, a few tweaks help. Go to WooCommerce, Settings, FilterKit Pro, Advanced.
- Smart Loading: Only loads code for features you have turned on. Features that are off add zero page weight.
- Built-In Caching: Filter counts are cached and only recalculated when products change.
- Click Throttling: 5 filter clicks in 1 second? Only the last one is processed. Prevents server overload.
- Page Builder Detection: Only loads code for the builder you use, not all 8.
- Turn On Variation Cache: Pre-calculates size/color combinations for instant lookups. Click "Build Cache" once, it auto-refreshes when products change.
- Turn On Product Index: Creates a dedicated lookup table. Noticeably faster on large catalogs.
- Adjust Cache Duration: Default: 1 hour. Lower it if inventory changes often, increase to 24 hours if products rarely change.
Works with WP Rocket, LiteSpeed Cache, W3 Total Cache, and most others. If filtered results look stale, add this to your caching plugin's exclusion list:
/?wc-ajax=filterkit_*
Compatibility
FilterKit Pro is tested with popular themes, builders, and plugins:
Detects these themes and applies fixes automatically:
- Astra (and Starter Templates), Flatsome, WoodMart, Kadence, OceanWP, GeneratePress, Storefront, Avada, flavor
Not on the list? "Generic" compatibility mode works with most WooCommerce themes. Email support if you have issues.
Elementor, Divi, Bricks, Breakdance, Beaver Builder, Oxygen, WPBakery, Gutenberg / Block Editor (with 4 native blocks).
- Multilingual: WPML, Polylang
- Currency: WCML, Aelia, CURCY, Currency Switcher for WooCommerce, Price Based on Country
- Caching: WP Rocket, LiteSpeed Cache, W3 Total Cache, WP Super Cache, WP Fastest Cache
- SEO: Yoast SEO, Rank Math, SEOPress, All in One SEO
- WooCommerce: HPOS, Cart & Checkout Blocks
Updating the Plugin
Back Up First
Use your hosting's backup tool or a plugin like UpdraftPlus. Standard practice for all WordPress updates.
Update
With an active license, updates appear in Dashboard, Updates. Click "Update Now." Or download the latest .zip and upload it via Plugins, Add New, Upload.
Your Settings Are Safe
Updates never erase your configuration. All filter setups, analytics data, waitlist entries, and settings are preserved.
Clear your caching plugin and CDN cache. Variation Cache and Product Index rebuild automatically.
Uninstalling
Plugins, Deactivate. Turns off filters on the front end but keeps all your settings and data. Reactivate anytime.
Plugins, Delete. Removes all plugin files AND all data: filters, analytics, waitlist, personalization, caches. Everything. Your WooCommerce products and attributes are not affected.
There is no "keep data" option on delete. This is intentional for privacy compliance. Export analytics data first using the CSV button if you want to keep it.
Common Issues
Filters Not Showing on Shop Page
- Plugin is activated and license key is entered
- At least one filter exists in WooCommerce, FilterKit Pro
- Filter placement matches your setup in WooCommerce, Settings, FilterKit Pro, General
- If using a page builder, the FilterKit widget/block is placed on your shop template
- All caches cleared (caching plugin, browser, CDN)
- Temporarily deactivate other filter or product plugins to check for conflicts
- Add
/?wc-ajax=filterkit_*to your caching plugin's exclusion list - If you are comfortable with it: press F12 in your browser, click Console, and check for red errors. Include those in your support email.
- Give it 24 hours of real customer traffic
- Confirm Analytics is on: WooCommerce, Settings, FilterKit Pro, Features
- If "Exclude Admin Sessions" is on, your own browsing will not show up. Try visiting logged out.
- WooCommerce, Settings, FilterKit Pro, General, Theme Compatibility. Pick your theme.
- Not listed? Try "Generic" mode
- Email support with your theme name and a screenshot
- Attributes need human-readable names. "Red" works. "CLR-001" does not.
- Added new attributes? Rebuild the index: WooCommerce, Settings, FilterKit Pro, General , "Rebuild Index"
- Check if basic keyword search works first
- Turn on Variation Cache: WooCommerce, Settings, FilterKit Pro, Advanced
- Click "Build Cache". Runs once, refreshes automatically.
- Also turn on Product Index for extra speed
- Check WooCommerce, Settings, Emails , FilterKit Pro Waitlist is enabled
- Test if your site sends emails at all. Try a test WooCommerce order.
- If emails do not send reliably, install WP Mail SMTP or FluentSMTP.
- Go to Settings, Permalinks in WordPress admin and click "Save Changes" without changing anything. This refreshes URL rules.
- If you changed URL structure in FilterKit Pro's SEO settings, save permalinks again after
- Check Display Rules. Filters might be set to "Desktop only".
- Test on an actual phone, not just by resizing your browser
- Clear mobile browser cache
- Counts reflect ALL active filters. If "Red" shows (5) but you expected (12), other filters are narrowing the count. This is correct. It shows products matching everything selected.
- Stale counts? WooCommerce, Settings, FilterKit Pro, Advanced , "Clear Cache"
- With variation-aware filtering, counts show buyable variations only
Still Stuck?
- Try switching to the Twenty Twenty-Four theme temporarily to rule out a theme conflict
- Deactivate other plugins one by one to find conflicts
- Email us at support@devtonicstudios.com with your site URL, theme name, and what is happening. We will dig in and fix it.
Quick Reference
Where to Find Things
- Dashboard & Filters: WooCommerce, FilterKit Pro
- Analytics: WooCommerce, FilterKit Analytics
- General Settings: WooCommerce, Settings, FilterKit Pro, General
- SEO & URLs: WooCommerce, Settings, FilterKit Pro, SEO & URLs
- Feature Toggles: WooCommerce, Settings, FilterKit Pro, Features
- Comparison: WooCommerce, Settings, FilterKit Pro, Comparison
- Advanced / Performance: WooCommerce, Settings, FilterKit Pro, Advanced
- License: WooCommerce, Settings, FilterKit Pro, License
- Email Reports: WooCommerce, Settings, Emails
Shortcodes
[filterkit_filters]Filter sidebar[filterkit_filtered_products]Product grid[filterkit_active_filters]Active filter chips[filterkit_search_bar]Smart search bar[filterkit_sort]Sort dropdown[filterkit_matrix_filter]Size × Color matrix
Plugin Details
- Version: 1.0.0
- Author: Devtonic Studios
- Requires: WordPress 6.0+, WooCommerce 8.0+, PHP 7.4+
- Themes: 9 auto-detected + Generic mode
- Builders: 8 with native widgets
- Support: support@devtonicstudios.com