
A customer just bought a print from you, or they have a photo they love, and now they want it framed to fit a gap on their wall. Forty by fifty, say. So they ask the obvious question: how much?
And you can’t just answer. You have to work out the glass for that size, the length of moulding to go around it, whether they want a mount, which frame they like. Five minutes of sums per enquiry, fired back by email, and half of them have wandered off to the framer in town by the time you reply.
Custom picture framing is one of those things that should be easy to sell online and somehow isn’t. Let me show you why, and then how to fix it properly.
A frame price is two sums, not one
This is the thing worth understanding before you build anything, because it explains the whole mess.
The glass and the backing board cover the full face of the picture. So they cost by area: width times height. Bigger picture, more glass. Simple enough.
The frame is different. It runs around the outside edge, so it costs by the distance around it, the perimeter, not the area. A long thin panorama can have a small area but a lot of edge to wrap in moulding.
Then sit three choices on top. The frame style, the type of glass, and the mount. Each one moves the price. Oak moulding costs more per length than plain black. UV glass costs more per area than standard. A double mount adds a flat lump.
So a frame price is an area sum, plus a perimeter sum, plus a few options. That is why a normal price box never fits framing, and why people give up and quote by hand. You need something that can run that whole calculation while the customer is still choosing.
Putting it together in PriceWise
I make a calculator plugin called PriceWise, and framing is honestly the example it was built for. Here is the setup.
Open Calculator Pro, add a new calculator, call it “Custom Framing”, and point it at your framing category. Save it before anything else, because the fields stay locked until the calculator exists.
Start with the size. Two Number fields, Width (cm) and Height (cm), with the unit right there in the label.
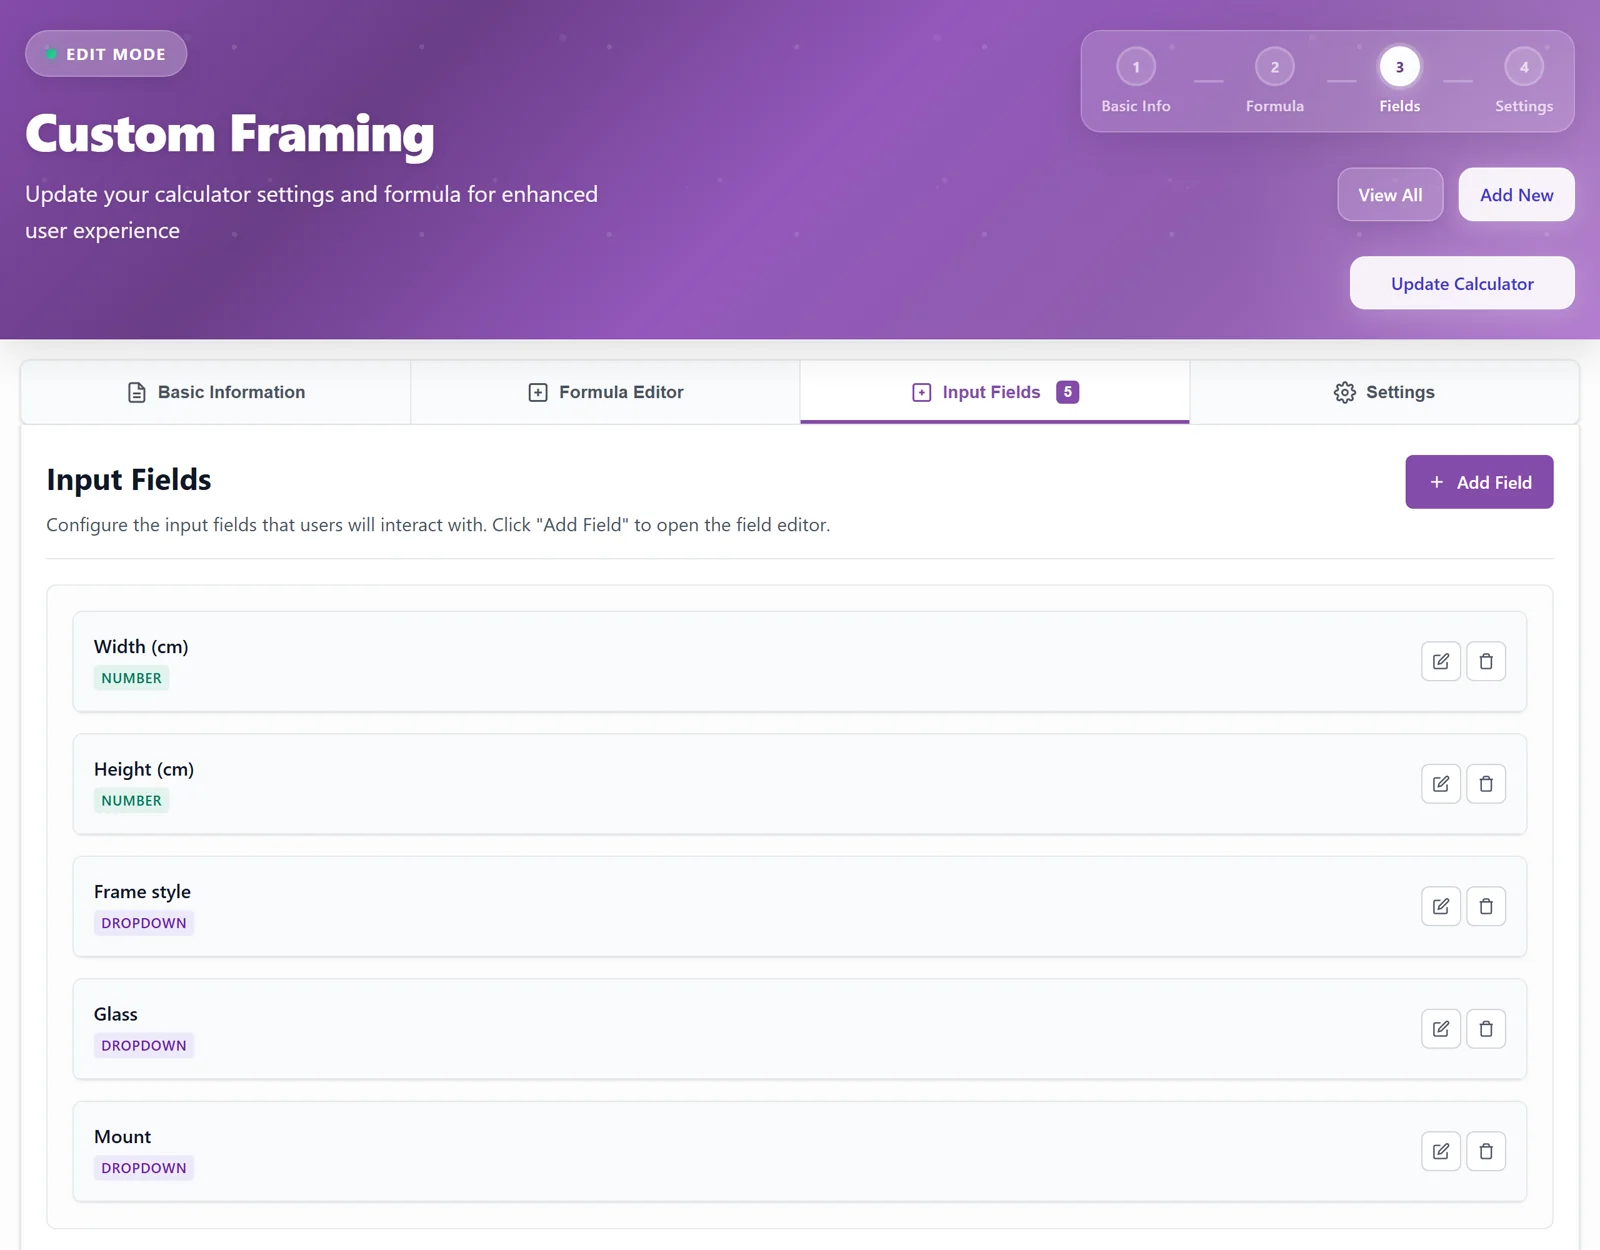
Then three dropdowns, and this is where the options live. Each choice in a dropdown carries a price, written as a label, a pipe, then a number:
Frame style, key frame, a rate per cm of edge:
Oak|0.12
Black|0.10
Gold|0.16
Glass, key glass, a rate per area:
Standard|0.004
UV protective|0.008
Mount, key mount, a flat amount:
None|0
White mat|8
Double mat|14
The customer reads the friendly names. The plugin quietly uses the numbers.
Now the formula that pulls all of it together:
width * height * glass + (width + height) * 2 * frame + mountRead it left to right and it is just the three things from before. width * height * glass is the glass across the whole face. (width + height) * 2 * frame is the distance around the edge times the frame rate. + mount drops in the matboard. PriceWise shows “Formula is valid” once it is happy with it.
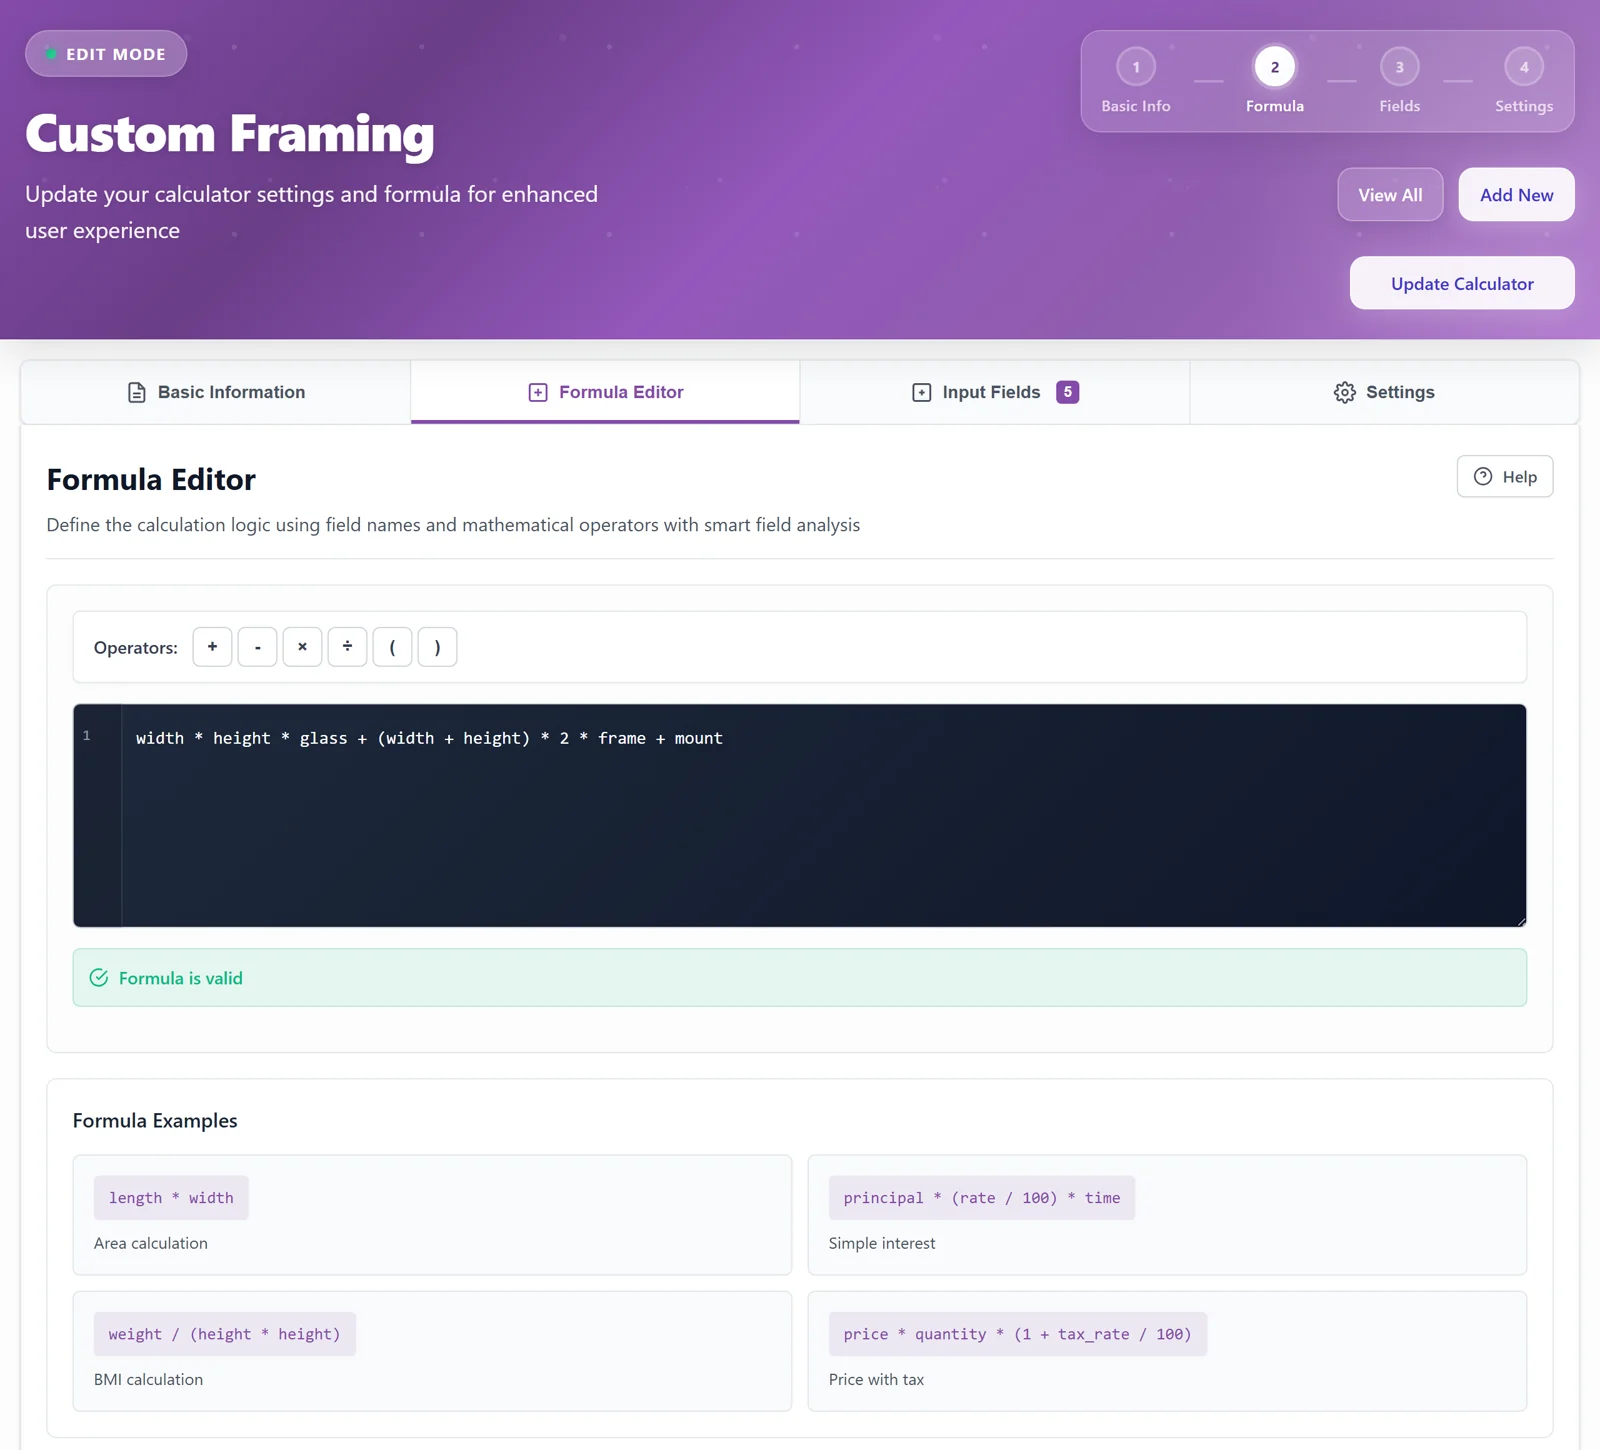
Run a real one through it. A 40 by 50 cm print, oak frame, standard glass, a white mat. The glass comes to 40 times 50 times 0.004, which is $8. The frame is 40 plus 50, doubled, times 0.12, which is $21.60. The mount is $8 flat. Total $37.60, and it lands the second they finish picking.
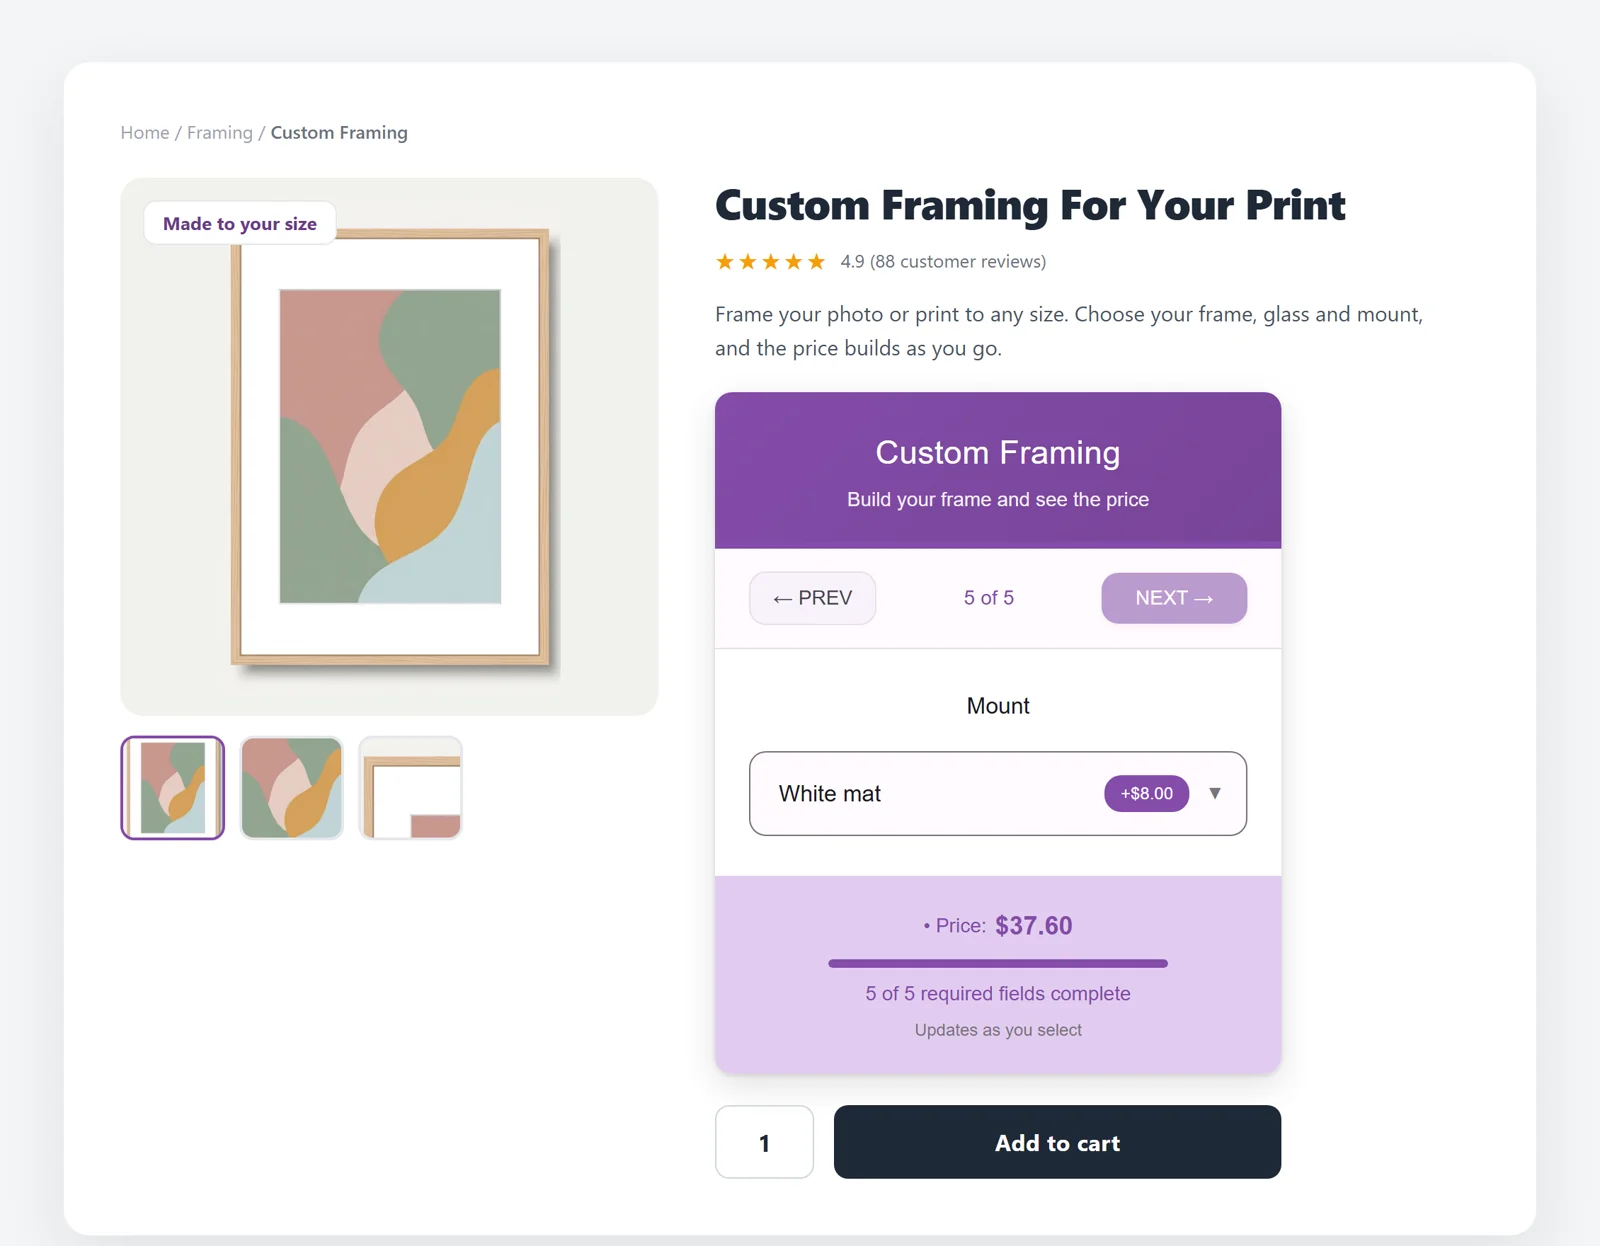
The order arrives with the whole spec
Here is the part that kills the email tennis. When the customer adds the frame to their basket, everything they chose travels with it: the width, the height, the frame, the glass, the mount. It shows in the cart, and it saves onto the order.
So the job that drops into your workshop already reads “400 by 500, oak, standard glass, white mat.” No one writes back to confirm a thing. You cut the moulding, cut the glass, build it.
One setting worth flicking on while you are in there: Hide Quantity Selector. Each frame is one specific piece for one specific picture, so a “quantity: 3” box next to it only ever confuses people.
The honest bits
A few things to know before it goes live.
The formula does straight math, with no minimum built in. If you have a minimum frame charge, set it as the product’s regular price instead of trying to force it into the formula, and say so on the page.
Watch your units. I used centimeters, with rates to match. Work in inches if you prefer, the setup is identical, just price your rates per inch.
If your framing gets properly involved, conservation mounts, museum glass, unusual shapes, you will add a dropdown or two. Keep the list short enough that nobody gives up halfway through.
And it prices the frame, not the postage. Framed glass is fragile and awkward to send, so leave delivery to WooCommerce shipping, most likely a flat rate for the breakable stuff.
What it comes down to
Framing is the clearest case for a calculator there is. Two sizes, three dropdowns, one formula that adds an area to a perimeter to a few options, and a price that builds as the customer plays with it. Stock WooCommerce cannot get near that, which is exactly the point.
PriceWise Calculator Pro is the plugin I make for this, and framing is near the top of what it ever gets asked to do, so if it copes with your frames it’ll cope with most things. The documentation covers the settings I skipped past. The real test is simpler than any price tag, though: think how many “how much to frame this?” emails you answered last month, and decide whether a price sitting on the page beats that.
If your work sits near framing, a couple of these might help too: cut to size for raw sheets, sell by the square meter for flat area like canvas, made to measure for curtains and blinds, and multiple options when you just want choices with a live price.