If you are running a WooCommerce store and you’ve decided to use Lemon Squeezy for payments, you probably hit the same wall I did. The official Lemon Squeezy WordPress plugin doesn’t connect to WooCommerce. It runs standalone. So you search Google, land on three different plugins that claim to do the job, and now you’re stuck figuring out which one to use and how to set it up without breaking your store.
In this article, I’ll show you how to connect Lemon Squeezy to WooCommerce the right way. Full setup from zero to your first test order, using the Lemon Squeezy for WooCommerce plugin we built at DevTonic Studios. I’ll cover what changed after the Stripe acquisition, how subscriptions and license keys work, and briefly mention the other plugins in this space so you can make a fair choice.
No code. No complicated config files. If you can use WordPress admin, you can finish this setup in about 15 minutes.
Why Lemon Squeezy with WooCommerce?
Lemon Squeezy is a merchant of record. That is a fancy term for this: when a customer pays you, Lemon Squeezy is the one actually selling the product legally. They collect the money, they handle the tax (VAT, GST, sales tax in every country), and they pay you a single payout at the end.
For store owners selling digital products like plugins, themes, courses, templates, ebooks, or SaaS, this is a huge relief. You don’t have to register for VAT in every country. You don’t deal with international tax forms. You just get your payout and a report.
The problem is, Lemon Squeezy doesn’t plug into WooCommerce out of the box. Their own WordPress plugin is standalone. It builds its own product catalog inside WP. If you already run a WooCommerce store with customers, cart, checkout, order history, reports, and other plugins, throwing all that away to use the LS standalone plugin is not practical.
That’s where a WooCommerce payment gateway plugin for Lemon Squeezy comes in. It adds Lemon Squeezy as a normal payment option at checkout, right next to PayPal or Stripe. Customers stay in your WooCommerce flow. Orders live in WooCommerce, Orders like every other order. You keep everything you already have.
Stripe bought Lemon Squeezy. Is it still safe to use?
Quick answer: yes.
In 2024, Stripe acquired Lemon Squeezy. The two stay separate products, but Stripe now owns the company. In the 2026 update from Lemon Squeezy, they confirmed LS keeps running as a merchant-of-record service for digital products. Payments still work. Subscriptions still work. Payouts still happen. The tax-handling benefit is still the main reason most people use it.
The acquisition came up a lot in Google searches, so it’s worth mentioning. But for the setup we’re about to do, nothing changes. The plugin works the same in 2026 as it did in 2023.
What you need before you start
Before you begin, check you have all of this:
- WordPress 5.8 or higher
- WooCommerce 6.0 or higher
- PHP 7.4 or higher (most hosts run 8.0+, so you’re likely fine)
- SSL on your site, a padlock in the browser. Lemon Squeezy requires HTTPS for webhooks.
- A Lemon Squeezy account. Sign up free at lemonsqueezy.com.
- At least one product created in your Lemon Squeezy store. Any product will do for now, even a placeholder.
Got all of the above? Let’s go.
Step 1: Install the Lemon Squeezy WordPress Plugin
Download the Lemon Squeezy for WooCommerce plugin from DevTonic Studios. You’ll get a .zip file by email after purchase.
Then in your WordPress admin:
- Go to Plugins, Add New, Upload Plugin
- Click Choose File and select the .zip you downloaded
- Click Install Now
- After install, click Activate
That’s it. If WooCommerce is active, the plugin adds itself to your payment gateways list and a new menu item appears: WooCommerce, Lemon Squeezy.
If you see an error about WooCommerce not being installed, install and activate WooCommerce first. The plugin won’t run without it.
Step 2: Get your Lemon Squeezy API key
Every Lemon Squeezy integration needs two things, an API Key and a Store ID. Here’s how to find both.
- Log into your Lemon Squeezy dashboard
- Go to Settings, API
- Click Create API Key
- Give it a name (like “WooCommerce Site”) and click Create
- Copy the key immediately. Lemon Squeezy shows it only once. If you lose it, you have to make a new one.
- Paste it in a safe place temporarily. You’ll need it in the next step.

To find your Store ID, stay in the Lemon Squeezy dashboard. Look at the URL when you are on your store’s dashboard home. It looks like app.lemonsqueezy.com/dashboard/STORE_ID. The numeric ID in that URL is what you need.
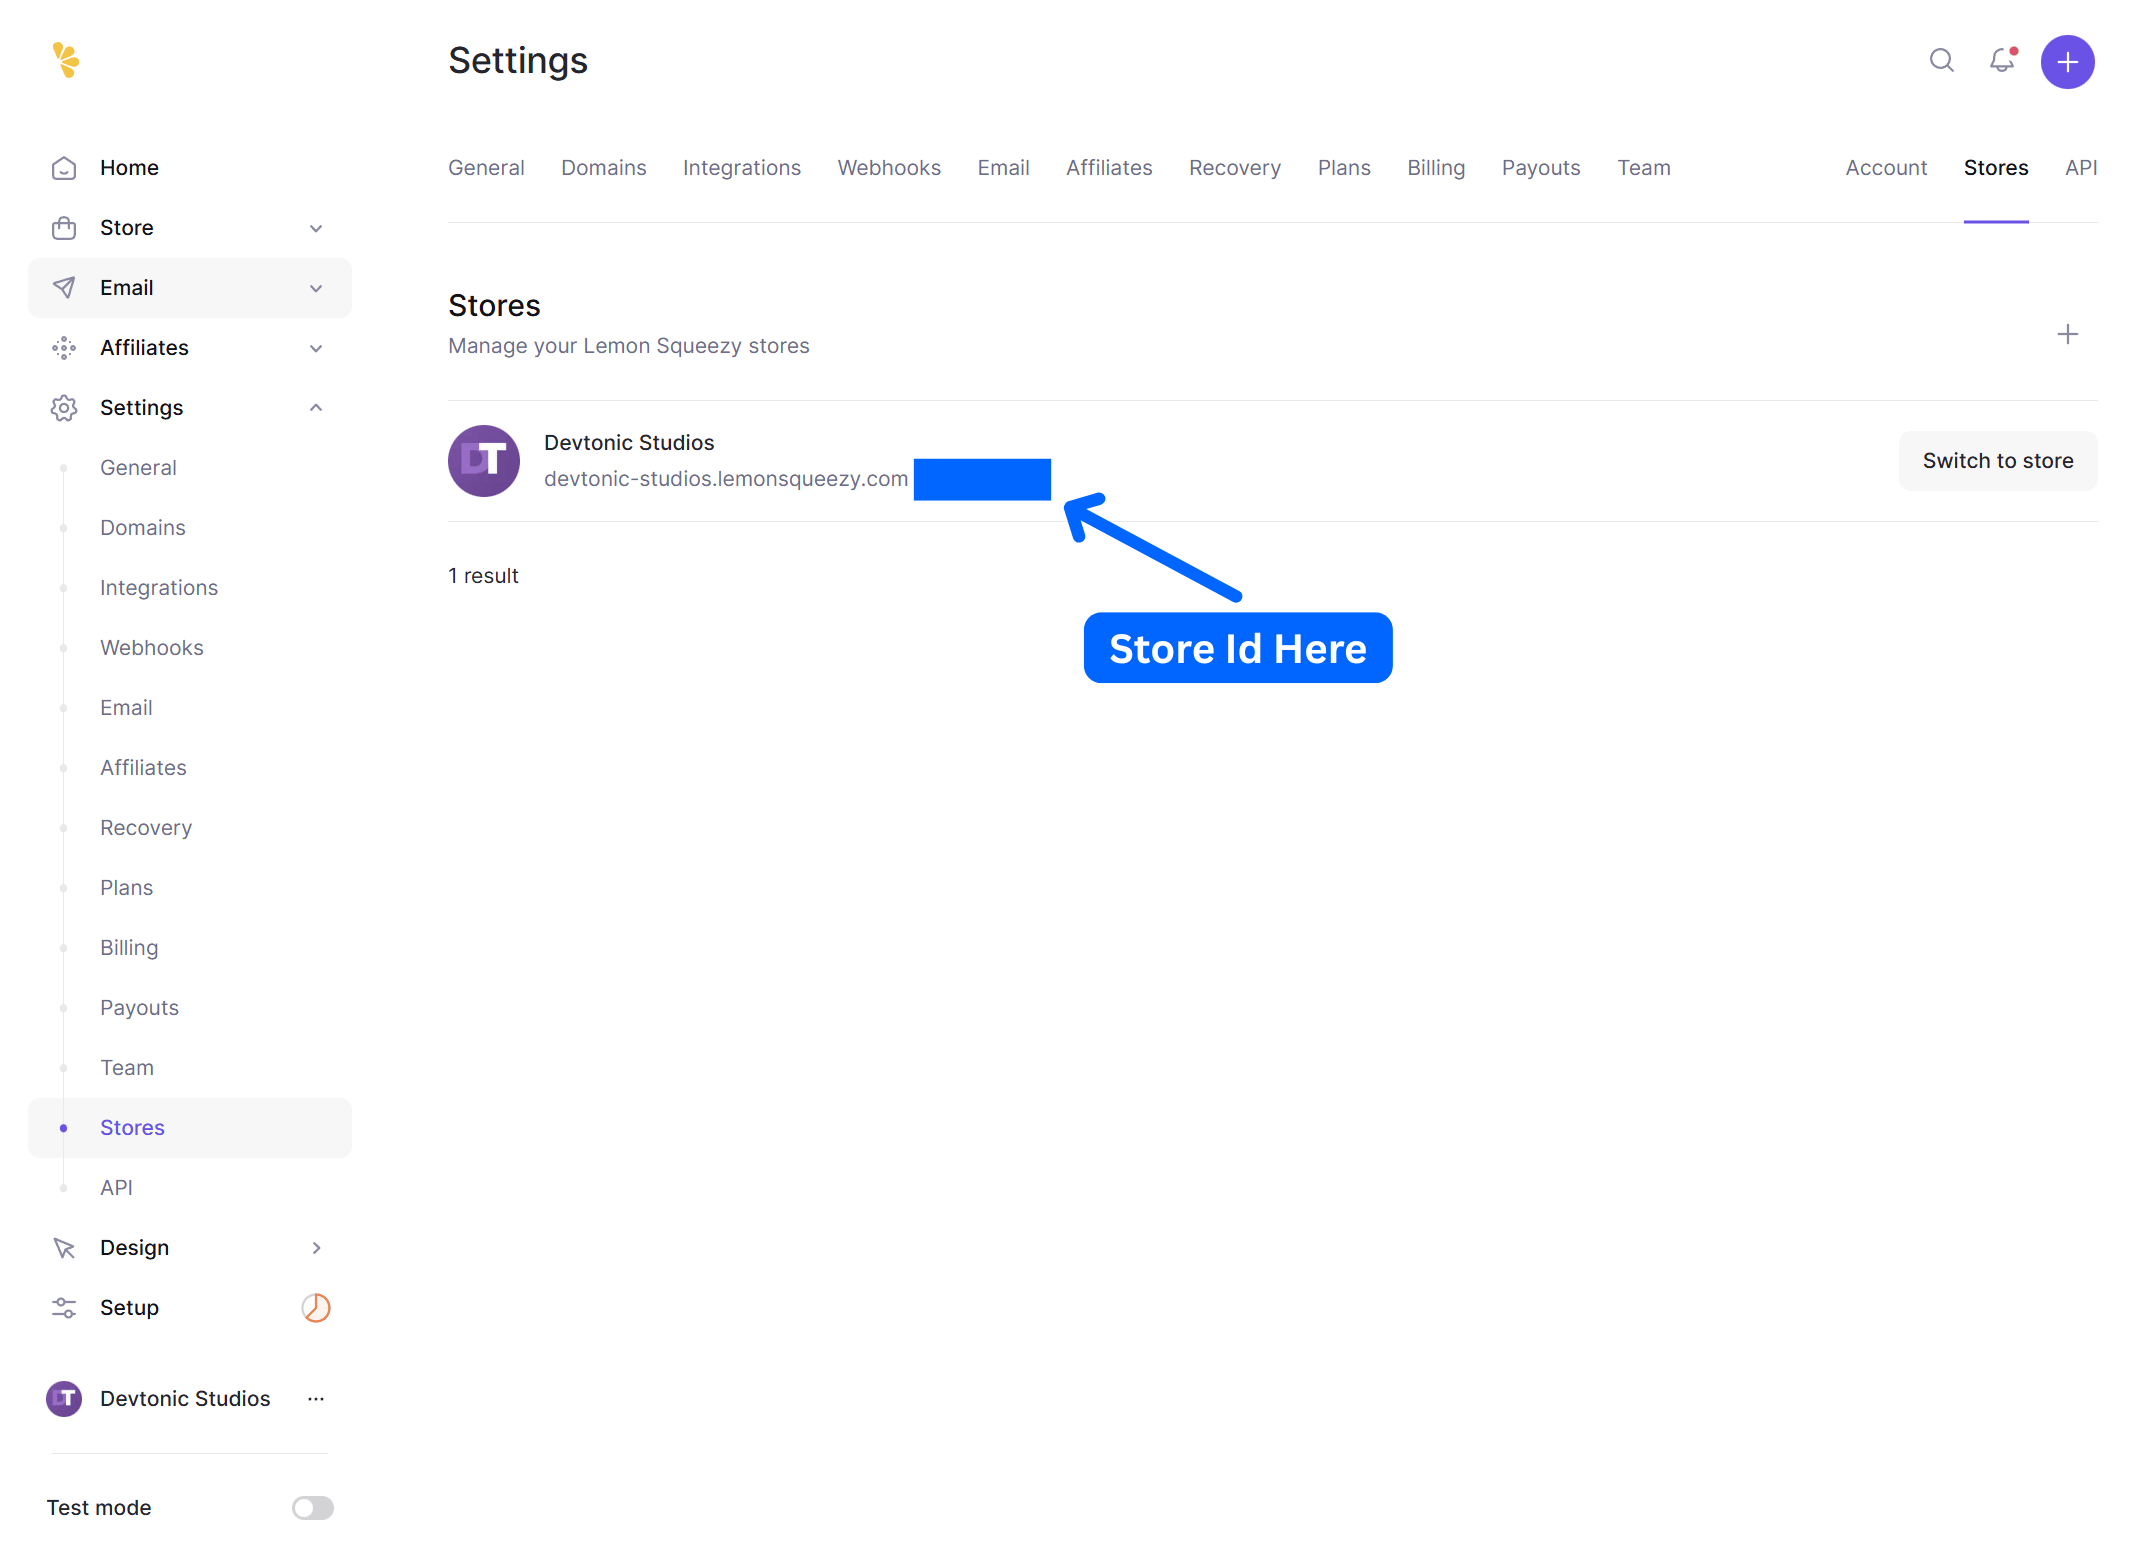
Keep both the API Key and Store ID handy for the next step.
Note: I always suggest you take a backup of your website before making any changes like adding new plugins. That way, if anything goes wrong, you can restore quickly.
Step 3: Configure the plugin in WooCommerce
Now we connect the plugin to your Lemon Squeezy account.
Go to WooCommerce, Settings, Payments, Lemon Squeezy.
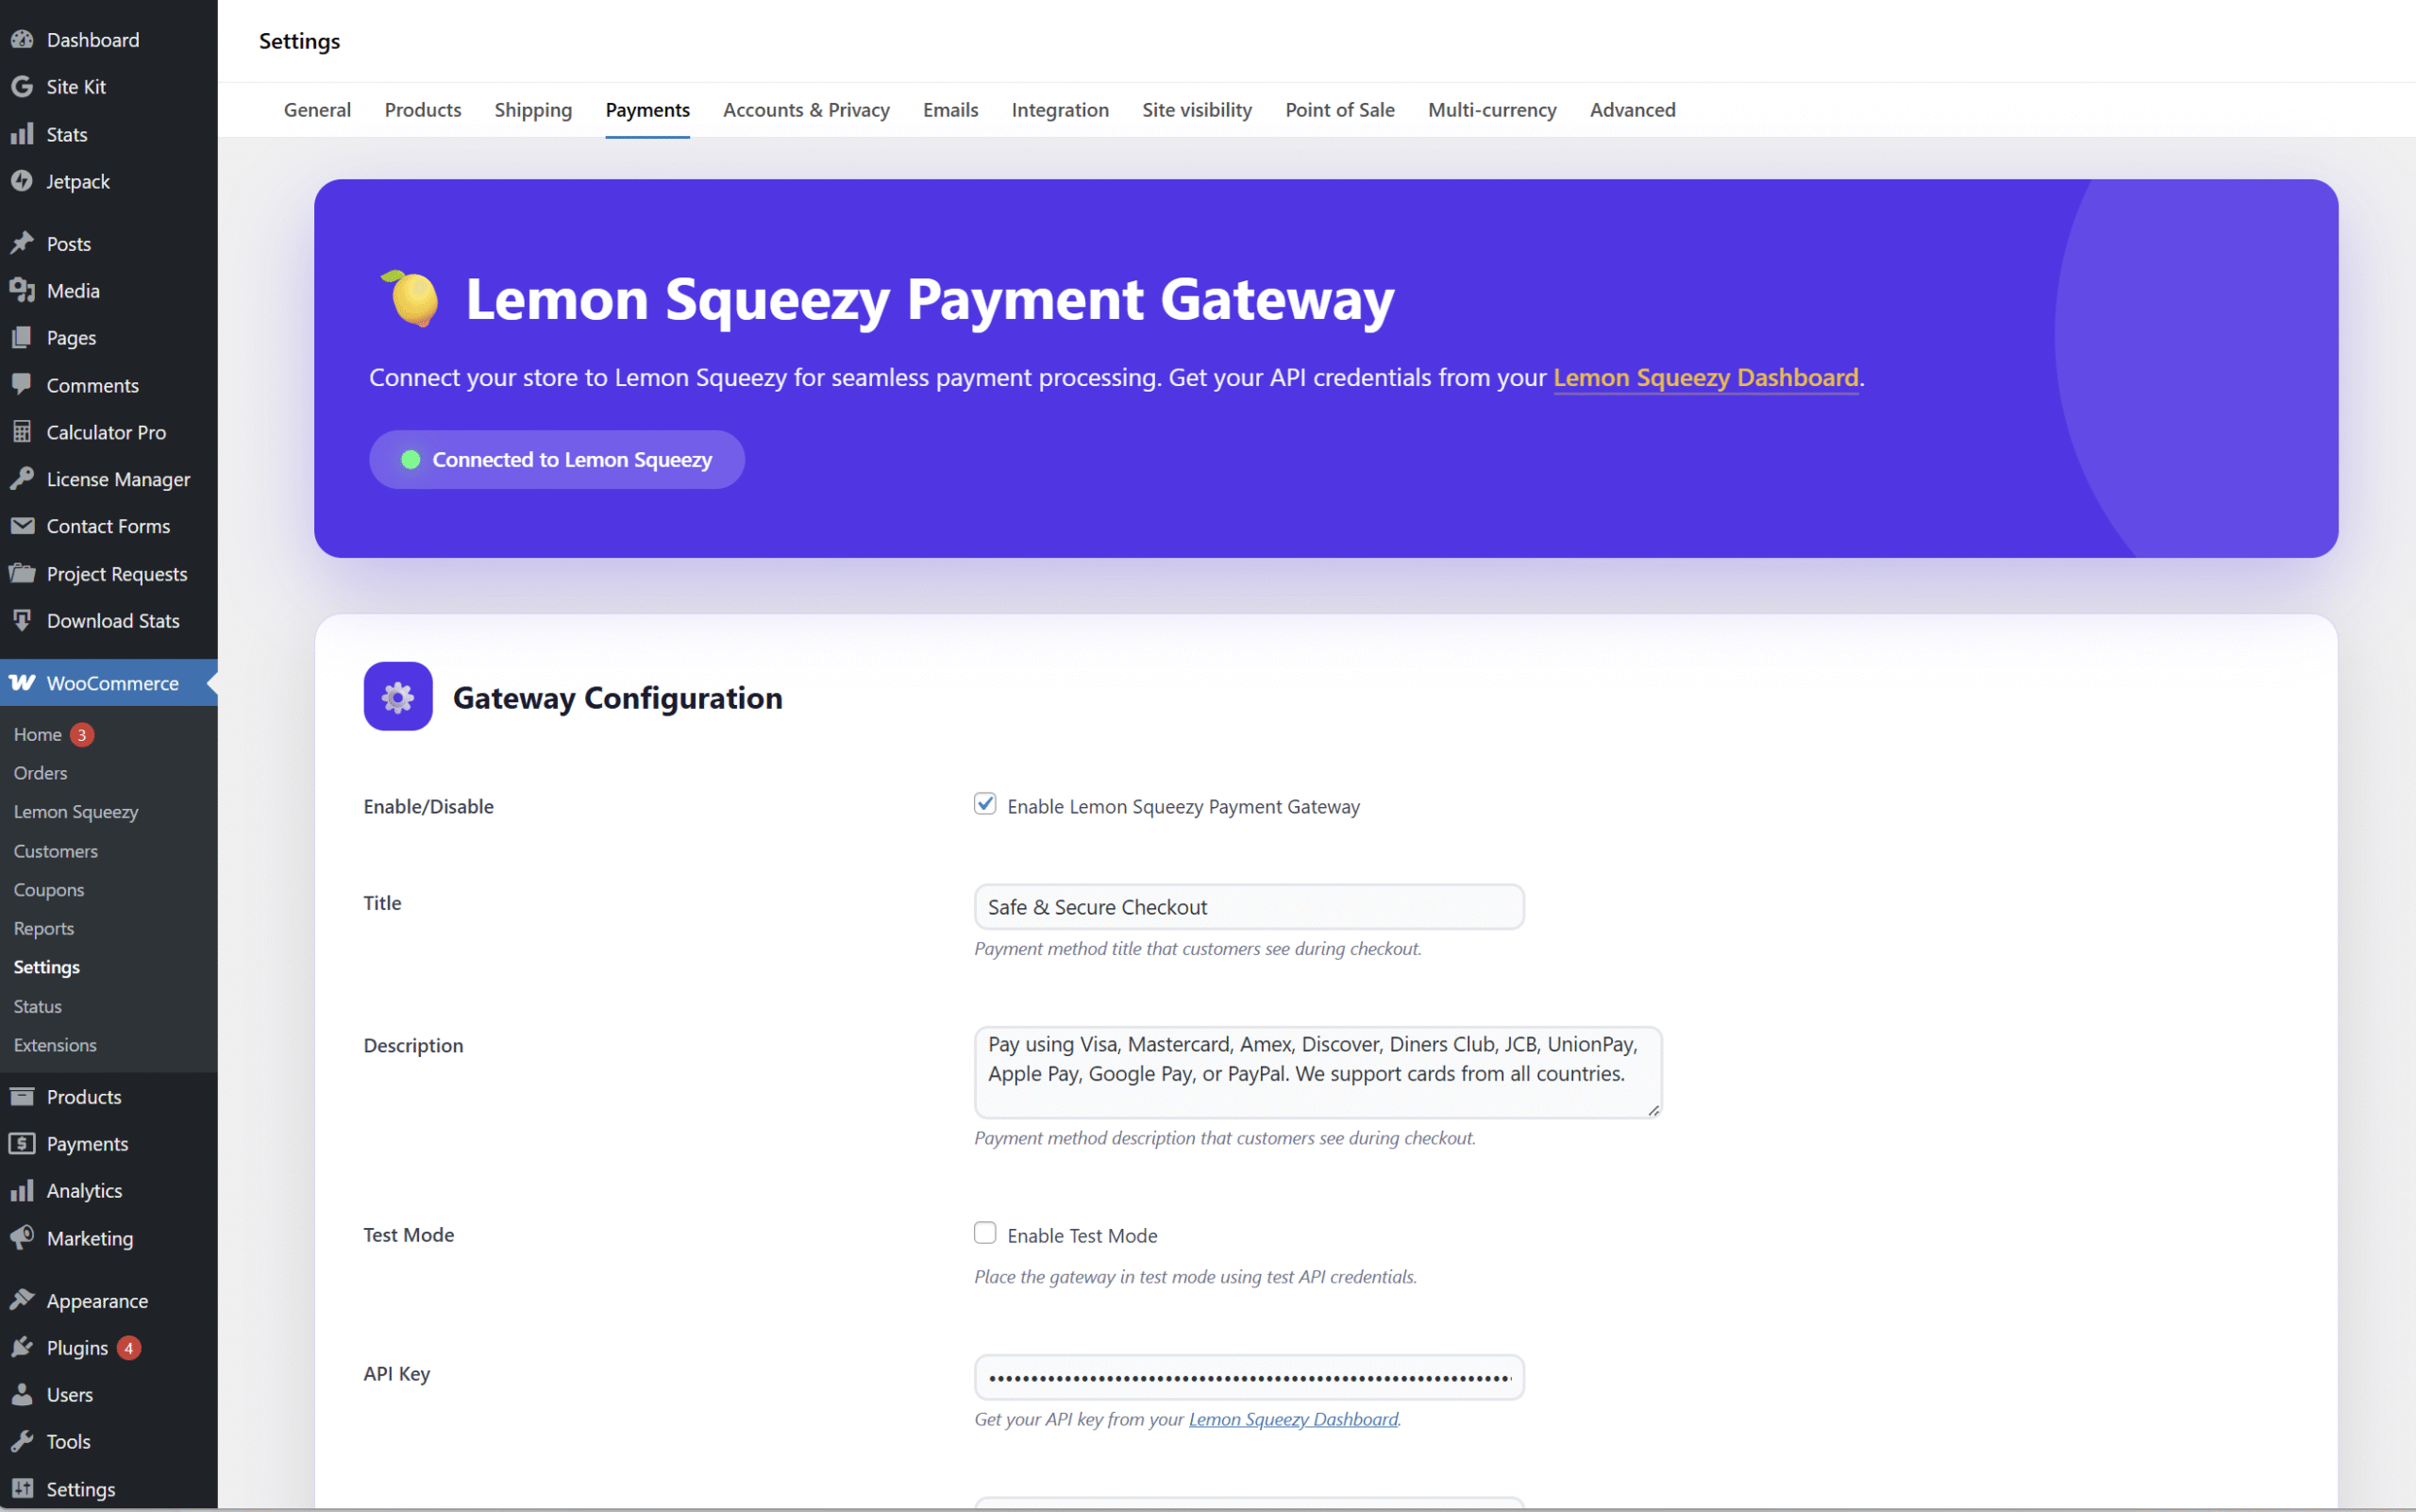
On this page, fill in:
- Enable/Disable: check this box to turn the gateway on.
- Title: what customers see at checkout. Something like “Credit Card, PayPal & More” works well (people recognize payment options they know).
- Description: shown under the title at checkout. Keep it short: “Pay securely with Visa, Mastercard, Amex, PayPal, Apple Pay, Google Pay, and more.”
- Test Mode: leave this ON for now. We turn it off only when going live.
- API Key: paste the key from Step 2.
- Store ID: paste the numeric ID from Step 2.
- Checkout Mode: start with “Overlay” (recommended). More on this in Step 6.
- Leave the other options at their defaults for now.
Click Save changes at the bottom.
Test your connection
After saving, scroll up and look for the plugin’s admin page at WooCommerce, Lemon Squeezy. You’ll see a “Test Connection” button in the Quick Actions area. Click it.
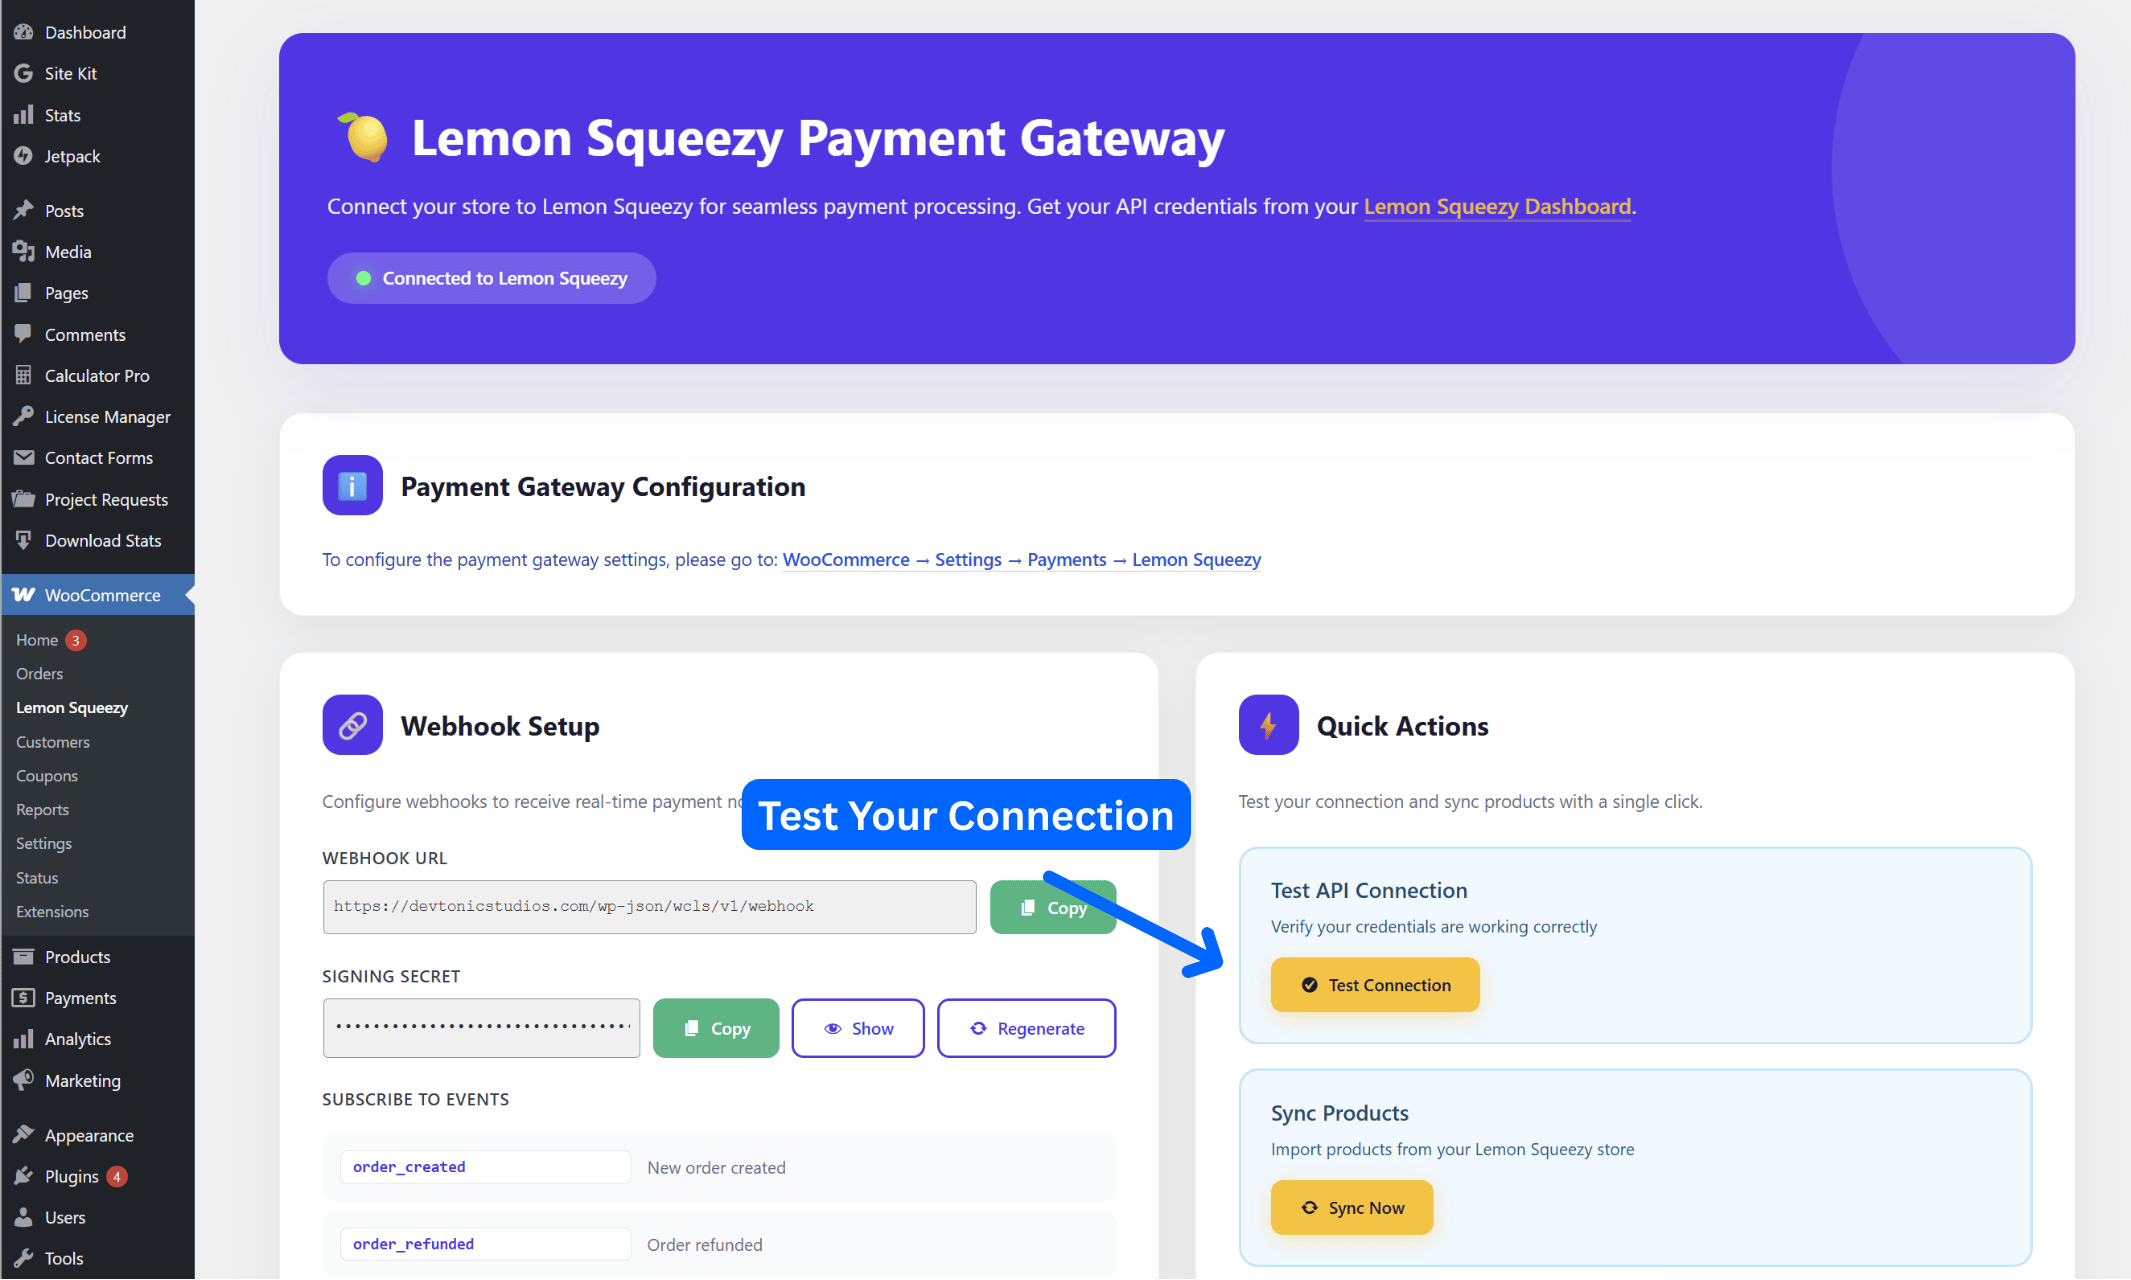
If everything is correct, you’ll see “Connection successful!” and the name of your Lemon Squeezy store.
If you get an error, check:
- The API key was copied correctly (no extra spaces)
- The Store ID is the numeric value, not the store name
- Your site has a valid SSL certificate
Step 4: Register your webhook (the easy way)
Webhooks are how Lemon Squeezy tells your WooCommerce store what is happening: when a payment succeeds, when a subscription renews, when a refund is processed. Without webhooks, your orders will never update automatically.
Most plugins make you set this up manually. You copy a URL, paste it in the LS dashboard, subscribe to events one by one, copy a secret, paste it back, cross your fingers. Our plugin has a one-click setup instead.
Go to WooCommerce, Lemon Squeezy. Scroll to the Webhook Setup section. Click Register Webhook on Lemon Squeezy.
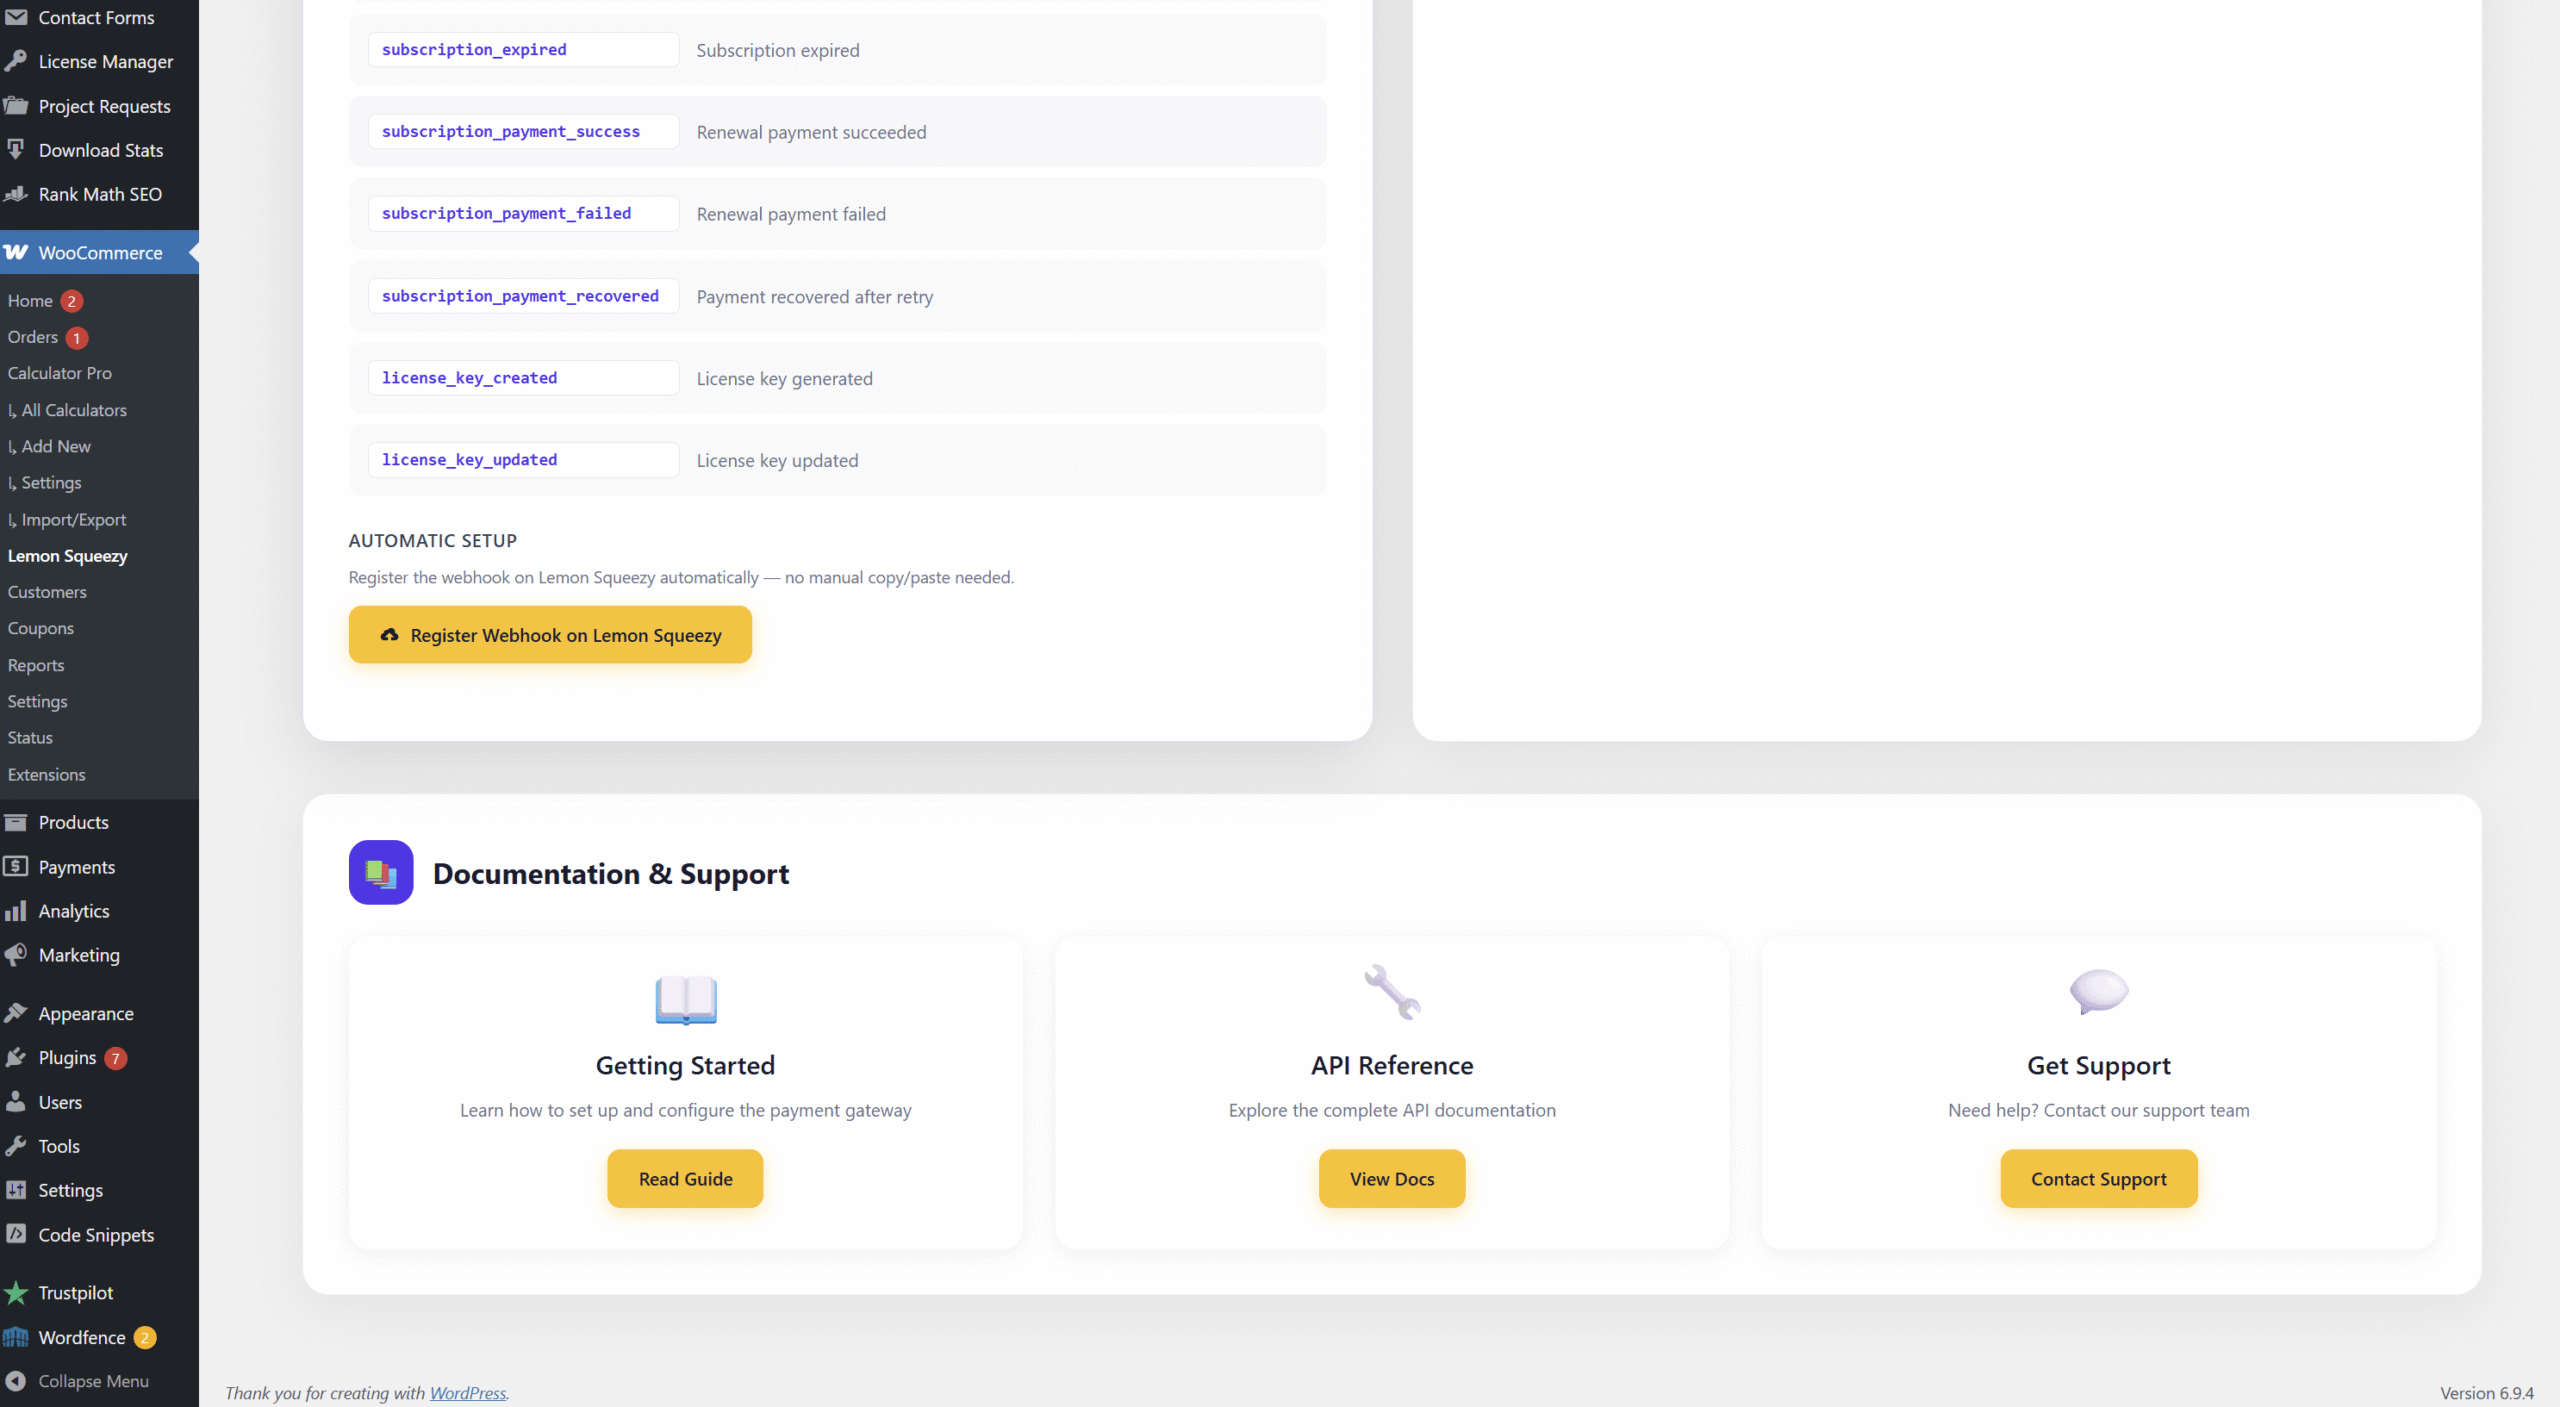
That’s it. The plugin talks to the Lemon Squeezy API, creates a webhook on your Lemon Squeezy account with the right URL, subscribes to all 14 events, and saves the signing secret. Automatically.
What these webhooks actually do
Here is the flow, simplified:
Customer pays on Lemon Squeezy
        ↓
LS sends a webhook to your WooCommerce site
        ↓
Plugin verifies the webhook signature (HMAC-SHA256)
        ↓
If valid, order status updates automatically
If invalid, rejected with a 401 error
The signature check matters. Every webhook includes an HMAC-SHA256 signature that is computed from your secret. The plugin uses a timing-safe comparison to verify the webhook really came from Lemon Squeezy and not someone trying to fake an order. If the signature is wrong, the webhook is rejected before any data is touched.
Note: If you prefer to set up the webhook manually for any reason, the Lemon Squeezy Documentation page has step-by-step instructions. See the Webhook Setup section of our full docs.
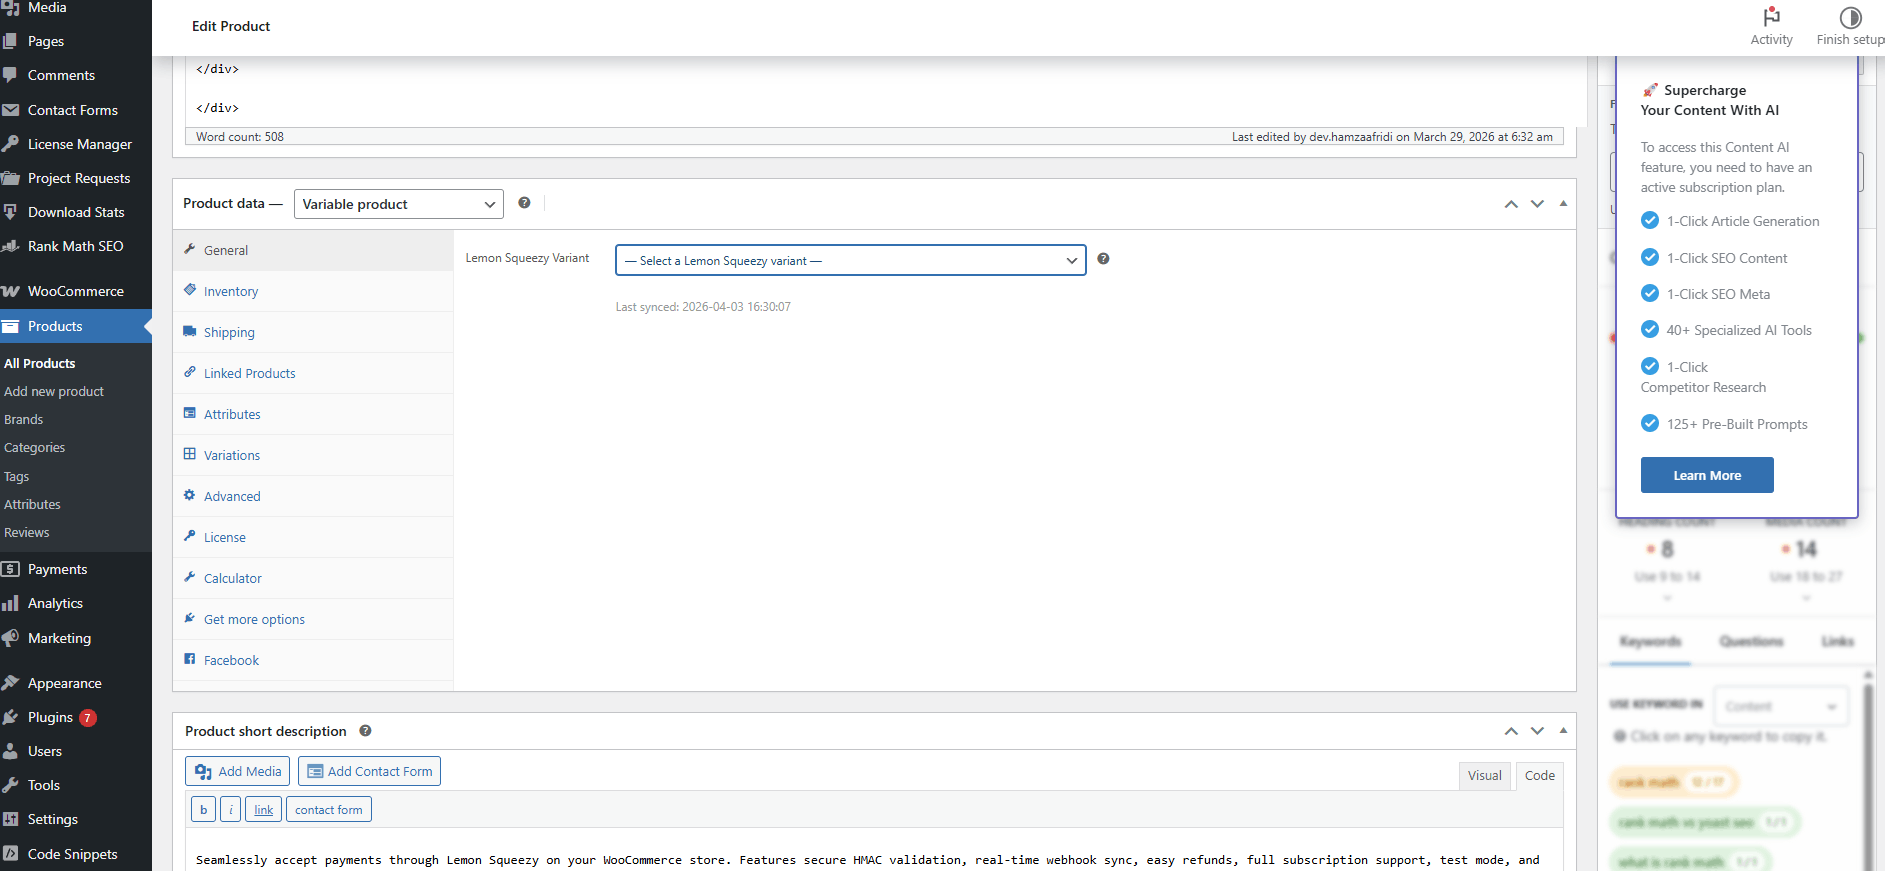
Step 5: Link your WooCommerce products to Lemon Squeezy
Each WooCommerce product has to point to a Lemon Squeezy “variant” so the plugin knows what to charge for. Here’s how.
Simple products (one product, one price)
- Open any WooCommerce product in your admin, Products, All Products
- Scroll down to the Product Data box
- You’ll see a new field: Lemon Squeezy Variant ID
To get the Variant ID, go to your Lemon Squeezy dashboard:
- Go to Products
- Click the three dots (⋯) next to your product
- Click Copy Variant ID
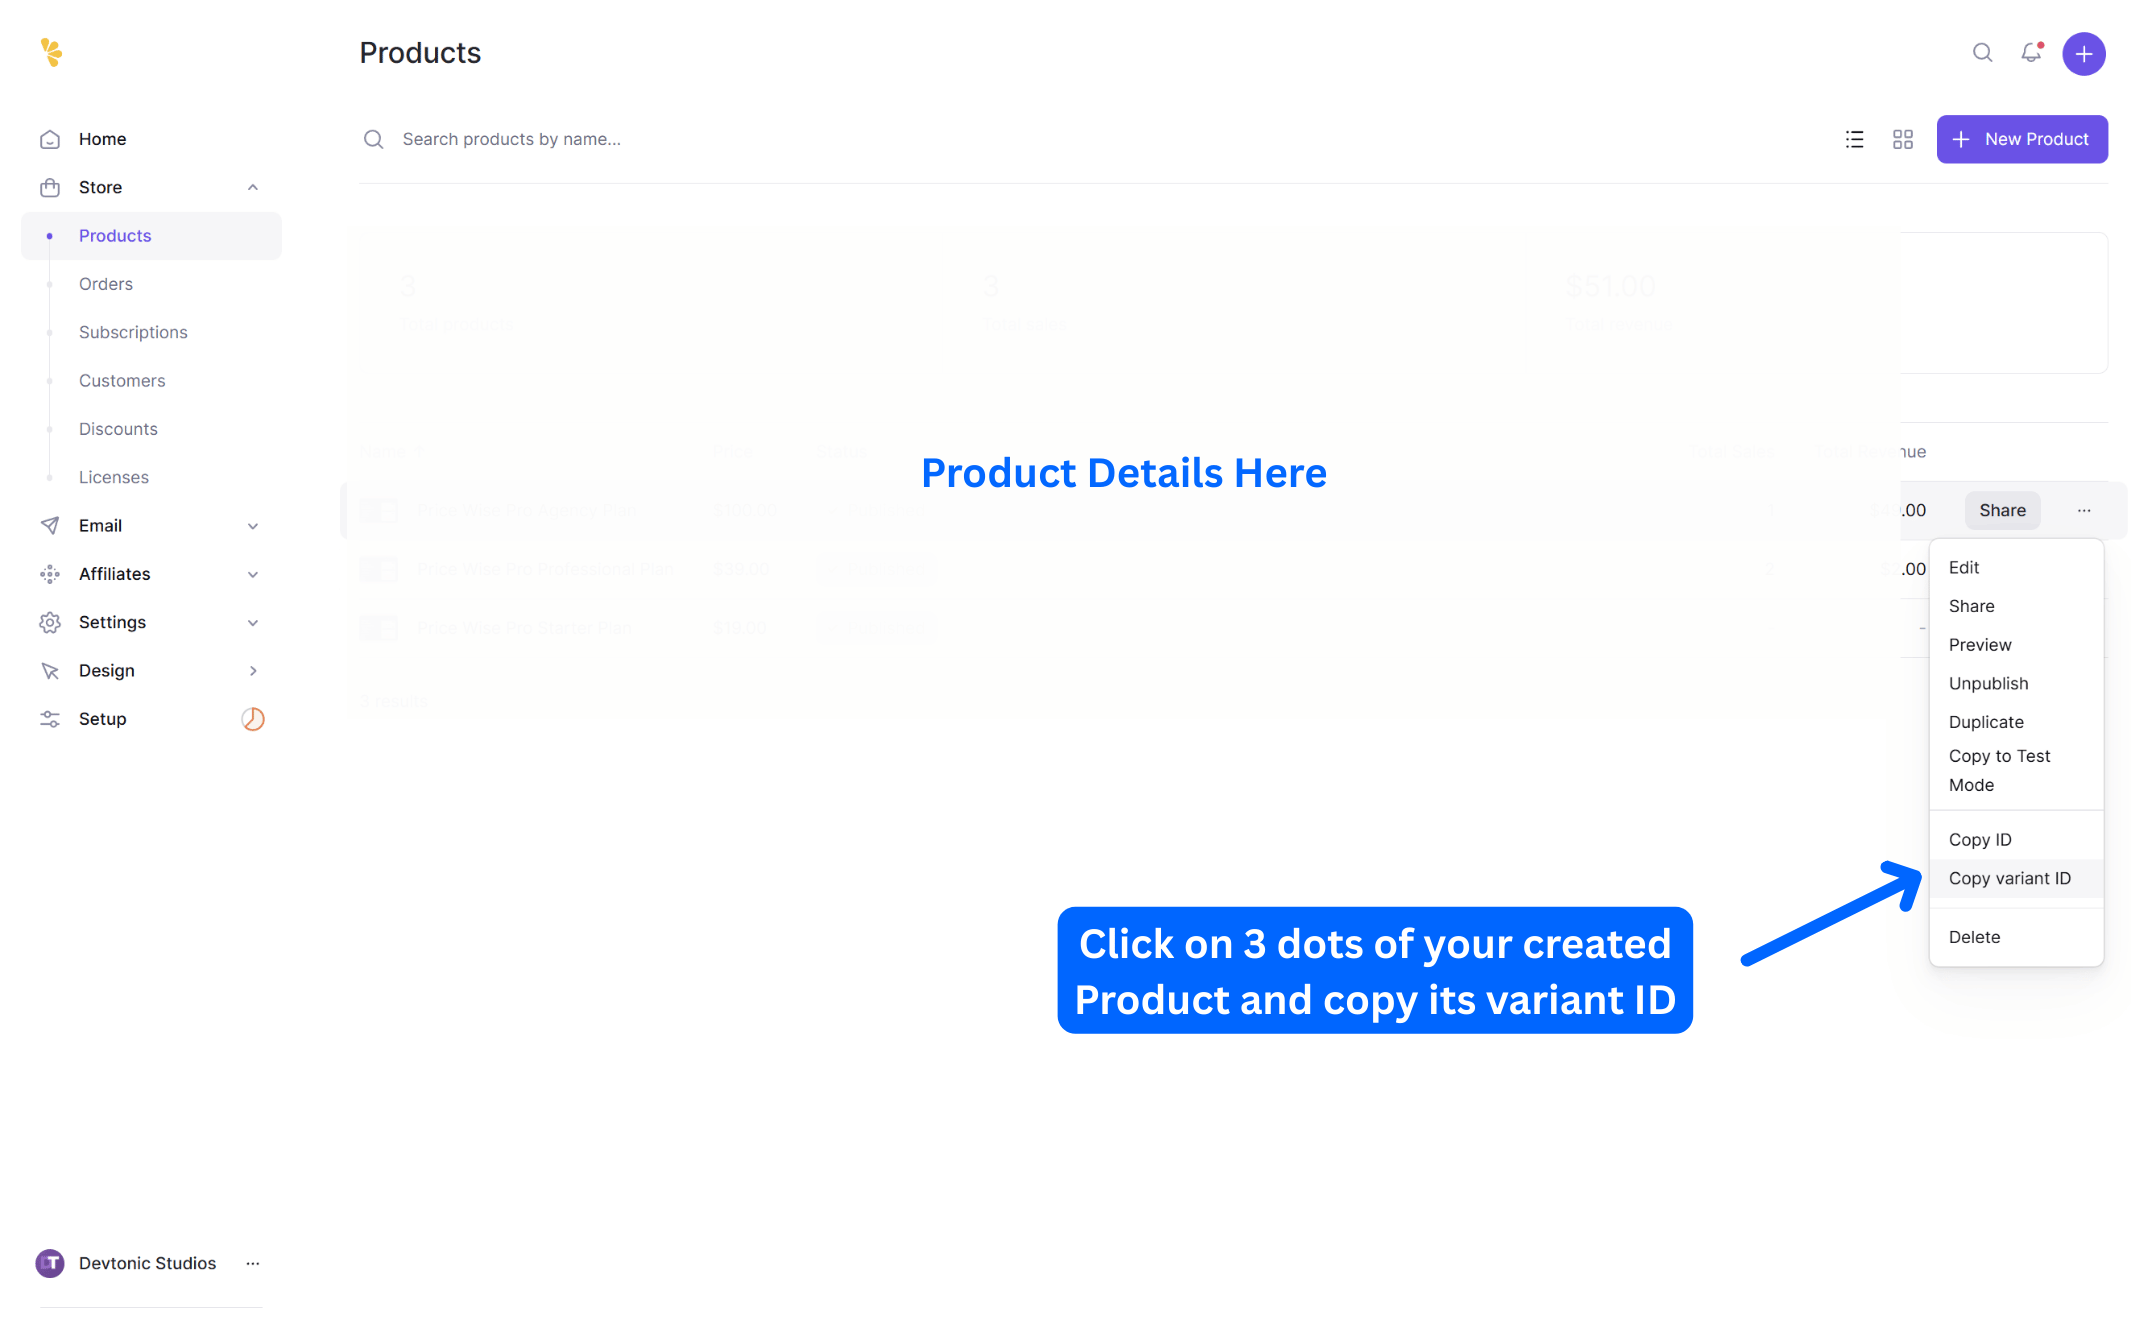
Paste that ID into the Lemon Squeezy Variant ID field in WooCommerce and update the product.
Variable products (one product, multiple variations)
If your product has variations, like a Basic/Pro/Enterprise plan, or different sizes, each variation gets its own Variant ID.
- Edit your variable product
- Go to the Variations tab
- Expand each variation
- You’ll see a LS Variant ID field on each

Paste the matching Lemon Squeezy Variant ID into each variation field.
If a variation has no variant ID set, the plugin falls back to the parent product’s variant ID. That’s useful as a safety net.
Step 6: Pick your checkout mode
The plugin supports two ways customers pay:
Overlay (recommended). The Lemon Squeezy checkout opens as a popup on your site. Customers never leave your store. They see a little popup, pay, and the popup closes. Feels smooth.
Redirect. Customers are sent to a hosted Lemon Squeezy checkout page on a different domain. They pay, then come back to your site.
Both work exactly the same on the backend. Orders are created, webhooks fire, subscriptions sync. No difference.
The difference is the customer experience. Overlay keeps them on your site, which usually converts better. Redirect can feel more “official” to some buyers because they end up on a proper checkout page.
To switch, go to WooCommerce, Settings, Payments, Lemon Squeezy, Checkout Mode and pick the one you want.
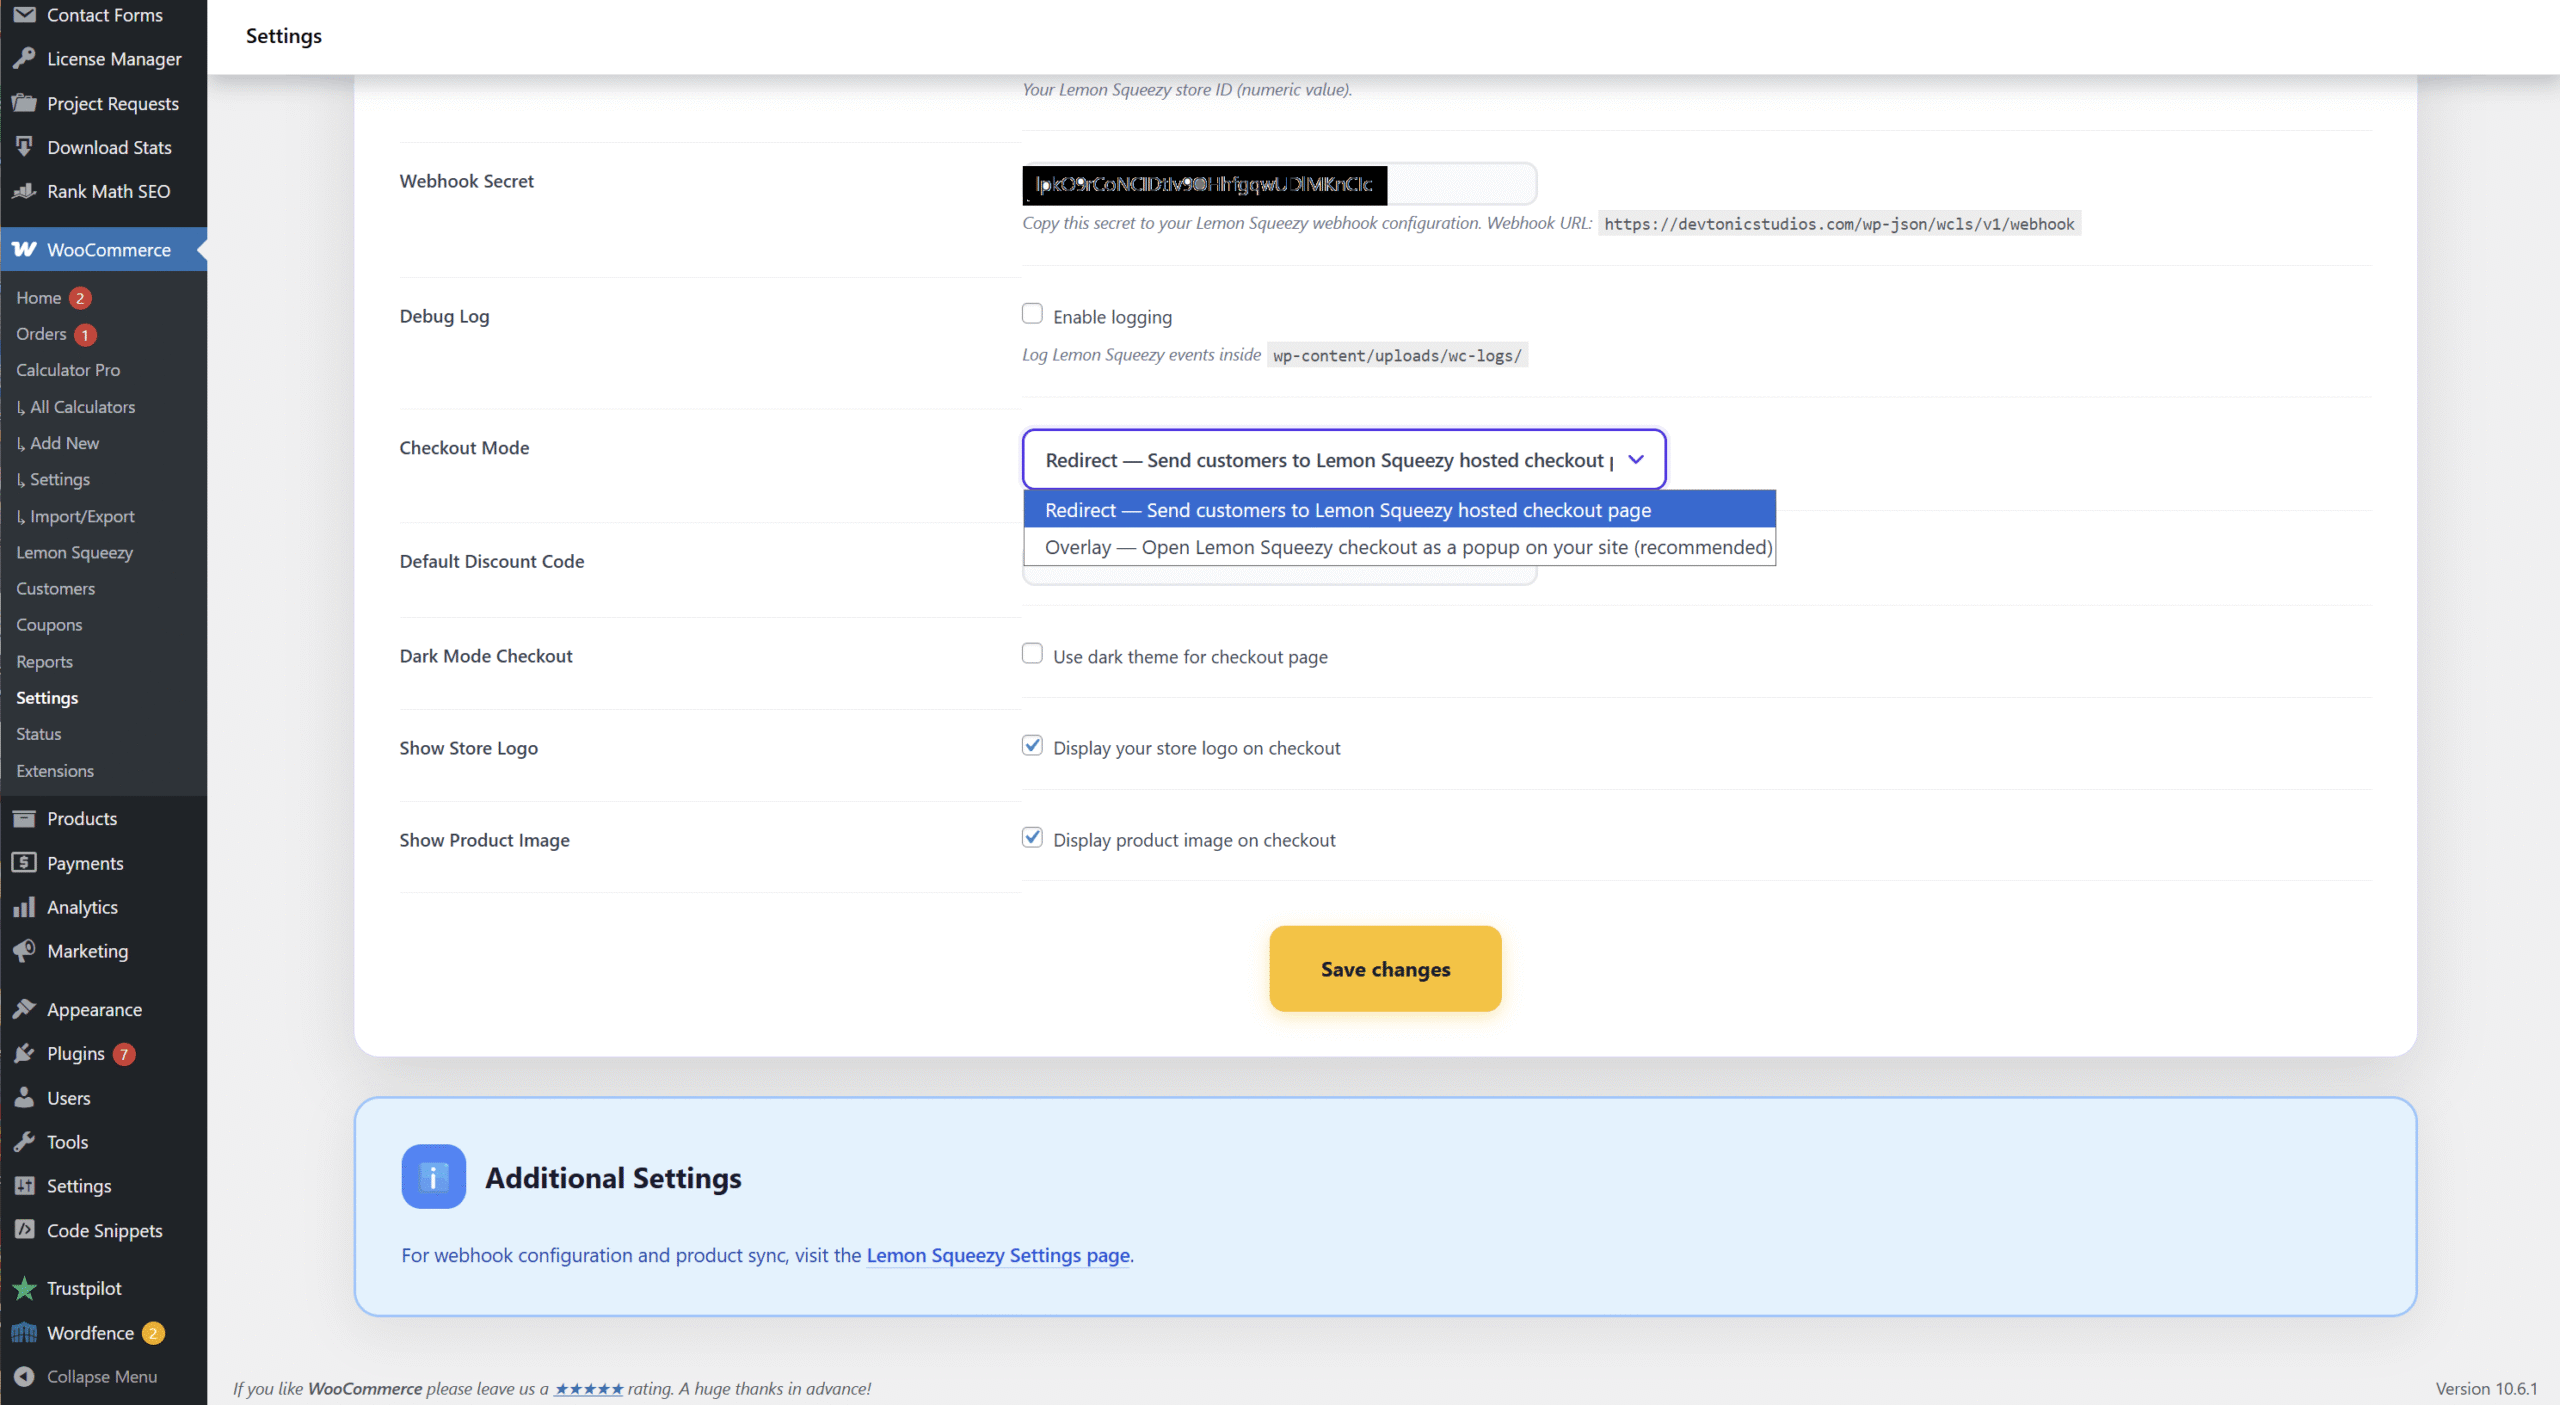
You can switch at any time, so don’t stress. Try both.
Step 7: Make a test purchase
Before going live, always do a full end-to-end test. Here’s how.
- Make sure Test Mode is still ON in the plugin settings (from Step 3)
- Go to your shop, pick a product, add it to cart
- Go to checkout
- Select “Lemon Squeezy” as the payment method
- Fill in the form with test data
- When Lemon Squeezy asks for a card, use their test card:
- Card:
4242 4242 4242 4242 - Expiry: any future date
- CVC: any 3 digits
- Submit the payment
After payment, check a few things:
- You land back on the WooCommerce “Thank You” page
- Go to WooCommerce, Orders. Your new order is there.
- The order status should be “Processing” (or “Completed” if the webhook arrived fast)
- Open the order. You should see a note saying “Payment completed via Lemon Squeezy”.
- Check WooCommerce, Status, Logs, wc-lemon-squeezy for the webhook log
If any step fails, the Troubleshooting section of our full documentation walks through the common issues.
What if you sell subscriptions?
This is where the plugin really shines.
Lemon Squeezy handles subscription billing end to end. When a customer subscribes, the plugin receives webhooks for every event in the subscription’s life:
subscription_created      = new subscription starts
subscription_updated      = status changes (paused, cancelled, active)
subscription_paused       = customer or you paused it
subscription_unpaused     = resumed after a pause
subscription_cancelled    = cancelled (customer keeps access until end date)
subscription_resumed      = resumed after a cancellation
subscription_expired      = access ended
subscription_payment_success     = renewal payment worked
subscription_payment_failed      = renewal failed, LS is retrying
subscription_payment_recovered   = failed payment retry succeeded
That last one is a big deal. If a customer’s card fails at renewal, Lemon Squeezy automatically retries the payment over several days. When it finally succeeds, the subscription_payment_recovered event fires and your WooCommerce order goes back to Processing. Your customer keeps their access. You don’t lose the revenue. This is called dunning recovery, and most payment integrations skip it entirely.
Customers also get management buttons in their WooCommerce My Account: “Manage Subscription” and “Update Payment Method”. These link to Lemon Squeezy’s customer portal. No need for the expensive WooCommerce Subscriptions plugin.
I’ll write a full deep dive on Lemon Squeezy subscriptions in WooCommerce in a follow-up post. This setup guide only scratches the surface.
What if you sell software licenses?
Selling plugins, themes, or SaaS? Lemon Squeezy can generate and manage license keys for you. The plugin captures them automatically.
Here’s what happens when a customer buys:
- Customer completes the purchase
- Lemon Squeezy generates a license key (you set the activation limit in your LS product settings)
- LS sends a
license_key_createdwebhook to your site - The plugin saves the key on the WooCommerce order
- The key is shown to the customer in three places:
- The order confirmation email
- The WooCommerce “Thank You” page after checkout
- The order details page in My Account, Orders
The customer’s license page in WooCommerce shows:
- The actual key (copy-friendly)
- The activation limit
- Status (active, disabled, etc.)
- Expiry date (if you set one)
No third-party license server plugin needed. Lemon Squeezy is the server, and our plugin surfaces the data inside WooCommerce.
A full guide on selling software licenses with this setup is coming in a follow-up post.
Other WooCommerce Lemon Squeezy plugins
To be fair, there are other plugins in this space. You might have seen them in your search:
- Woo Lemonsqueezy Gateway by GrandPlugins, a long-standing WooCommerce LS plugin. Solid basics, redirects checkout only, no license key support at the time of writing.
- Lemon Squeezy Payment Gateway for WooCommerce by LoquiSoft, similar feature set, redirects to LS checkout.
Both are fine plugins. If you just need basic LS payments in WooCommerce and don’t care about license keys or overlay checkout, they will work.
Where our plugin fits better:
- You sell software licenses and want them delivered automatically inside WooCommerce
- You want the overlay checkout so customers stay on your site
- You want the one-click webhook setup instead of manually copy-pasting URLs and secrets
- You want full subscription lifecycle handling including dunning recovery
- You use PriceWise Pro for custom product options. Our plugin passes those options through to Lemon Squeezy so the final checkout total matches exactly.
It’s OK to test a few and see which one feels right. Most plugins offer a 14-day refund, including ours.
Going live
Once your test order works end to end, switching to live mode is simple.
- Go to WooCommerce, Settings, Payments, Lemon Squeezy
- Turn OFF Test Mode
- Click Save
That’s it.
Before announcing the launch, I’d suggest you:
- Enable the plugin’s Debug Log. It writes every event to
WooCommerce, Status, Logsso if anything goes wrong, you can see what happened. - Make one real purchase with your own card. A small product you can refund afterwards. This catches any difference between test mode and live mode.
- Monitor your first 3 to 5 orders manually to confirm webhooks are firing correctly
After that, it runs on its own.
Frequently Asked Questions
What is a merchant of record?
A merchant of record (MOR) is the company legally selling the product to the customer. They collect the money, handle taxes (VAT, GST, US sales tax), and pay you a single payout. Lemon Squeezy is a merchant of record. Stripe is not. This is the main reason small SaaS founders and digital product sellers pick Lemon Squeezy over Stripe.
Is Lemon Squeezy still working after the Stripe acquisition?
Yes. Stripe bought Lemon Squeezy in 2024 but kept it running as a separate merchant-of-record product. Payments, subscriptions, license keys, and payouts all work the same in 2026 as they did before. No setup changes for existing or new stores.
What’s the difference between Lemon Squeezy and Stripe on WordPress?
Stripe is a payment processor. You stay legally responsible for taxes everywhere you sell. Stripe fees are around 2.9% + 30 cents per transaction. Lemon Squeezy is a merchant of record. They handle taxes globally for you. Their fees are around 5% + 50 cents per transaction. For small stores selling digital products globally, Lemon Squeezy is usually the cheaper option once you factor in tax compliance work.
Can I use Lemon Squeezy for subscriptions in WooCommerce?
Yes, and you do not need the WooCommerce Subscriptions plugin (which costs $199/year). Our plugin handles the full subscription lifecycle through Lemon Squeezy webhooks. Customers can manage and cancel subscriptions from their WooCommerce My Account page.
How does Lemon Squeezy handle taxes?
Lemon Squeezy collects and remits VAT, GST, and US sales tax automatically based on the customer’s location. You do not file or remit these taxes yourself. You only pay regular income tax on your final Lemon Squeezy payouts in your own country.
Can a customer cancel their Lemon Squeezy subscription?
Yes. The “Manage Subscription” button on their WooCommerce My Account order opens the Lemon Squeezy customer portal, where they can pause, cancel, update payment method, or download invoices. The cancellation event is automatically reflected on the WooCommerce order.
Do I need WooCommerce Subscriptions to use Lemon Squeezy with WooCommerce?
No. Our plugin handles all subscription logic through Lemon Squeezy webhooks. The expensive WooCommerce Subscriptions plugin is not needed.
Wrap-up
To get Lemon Squeezy working on WooCommerce, you need three things:
- The right plugin. One that handles webhooks properly and supports the features you need (subscriptions, licenses, overlay checkout).
- Correct API setup. API key, Store ID, and a webhook that receives all 14 events.
- Product linking. Every WooCommerce product connected to a Lemon Squeezy variant.
The full Lemon Squeezy for WooCommerce plugin from DevTonic Studios handles all of this. One-click webhook setup, license keys, subscriptions with dunning recovery, overlay or redirect checkout. Starts at $39/year or $79 lifetime with a 14-day refund if it’s not the right fit.
For the deeper technical details like hooks, filters, HPOS notes, and troubleshooting, check the full documentation.
If you get stuck anywhere in this setup, email us at support@devtonicstudios.com and we’ll help you through it.