The first time I set up a Lemon Squeezy webhook by hand, it took me 40 minutes and three failed attempts. I typed the URL wrong on the first try. Generated the secret in the wrong tab on the second. Forgot to flip my site to HTTPS on the third. It worked on attempt four. I called it a victory and went to bed.
Later I realized the whole process is mechanical. Click a button, generate a secret, paste a URL, tick 14 boxes. A machine should do this, not me. So when I built the Lemon Squeezy for WooCommerce plugin, the first feature I added was a “Register Webhook on Lemon Squeezy” button that does all of it in one click.
This article walks you through both paths. The manual way (so you actually understand what’s happening). Then the easy way (in case you’ve already burned an hour and just want it working).
What webhooks actually do
Webhooks are how Lemon Squeezy tells your WordPress site that something happened. Customer paid. Subscription renewed. License key generated. Refund issued.
Without webhooks, your site has no idea. A customer pays on Lemon Squeezy’s hosted checkout, the money lands in your LS account, and your WordPress site never updates the order, never delivers the license key, never marks the subscription active. Nothing happens on your end because nothing tells it to.
With webhooks, the moment something happens on LS, they send a small HTTP request to your site that says “hey, order #12345 just got paid.” Your site receives it, processes it, updates the order, sends the email, generates the license key. All automatic.
If you sell anything that needs an after-payment action (license keys, subscription access, course enrollment, downloadable files), webhooks are not optional. They are the entire link between LS and WordPress.
The webhook URL you actually need
If you’re using our plugin, the URL is always this:
https://yoursite.com/wp-json/wcls/v1/webhookReplace yoursite.com with your actual domain. That’s a REST API endpoint the plugin registers automatically. You don’t have to build it.
Three requirements LS enforces:
- Must be HTTPS. LS refuses to deliver to plain HTTP, no exceptions.
- Must be publicly accessible. No localhost, no 192.168.x.x addresses.
- Must respond with HTTP 200 within 15 seconds, or LS counts it as a failure.
The plugin handles the URL, the HTTPS enforcement, and the fast response. You just need a live site on HTTPS.
The 14 events your store actually needs
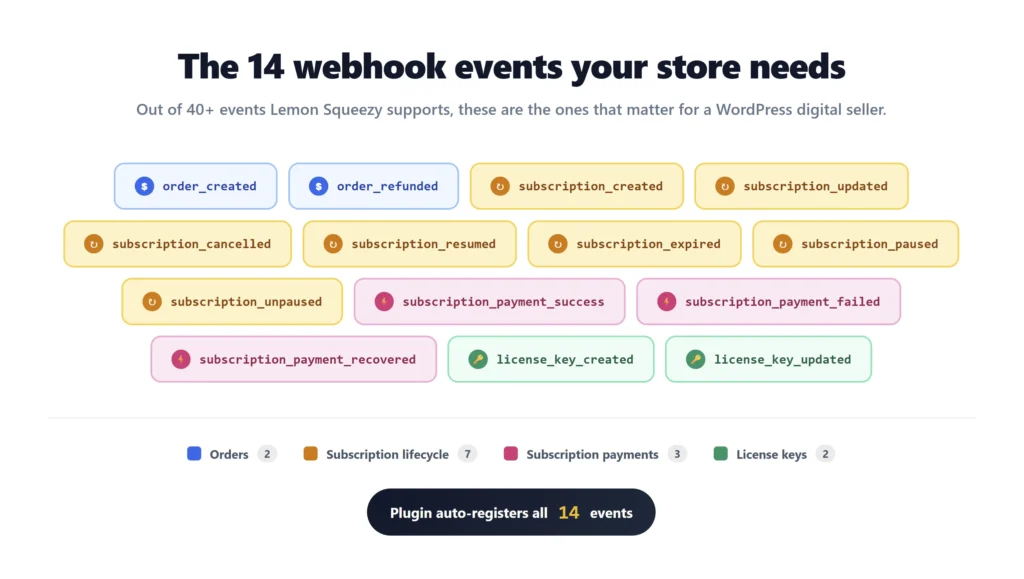
LS supports around 40 different webhook events. Most stores don’t need all of them. Our plugin auto-registers the 14 that matter for a WordPress digital seller. Here’s what each one does and why you need it.
Order events
order_createdfires when a customer completes a purchase. Without this, your site never marks the order as paid. Without it, nothing else works. This is the main one.order_refundedfires when you issue a refund. Your site updates the order status, revokes downloads if needed, and triggers any post-refund logic.
Subscription lifecycle events
subscription_createdfires when someone starts a recurring subscription. Marks the user as active.subscription_updatedfires when a sub changes (plan upgrade, downgrade, address change, etc.).subscription_cancelledfires when the customer cancels. Their access continues until the term ends, but the renewal won’t happen.subscription_resumedfires when a cancelled subscription gets reactivated.subscription_expiredfires when a subscription reaches the end of its term and isn’t renewing. Now is when you actually revoke access.subscription_pausedfires when the customer puts their subscription on hold.subscription_unpausedfires when they resume from pause.
Subscription payment events
subscription_payment_successfires on every successful renewal. Without this, you never know they paid for another month.subscription_payment_failedfires when a card declines. Without this, you don’t know to chase them.subscription_payment_recoveredfires when LS’s automatic dunning recovery succeeds. This is the magic event. Most platforms don’t have dunning. LS does. Catch this event and you can welcome them back, log the recovery, send an email, whatever.
License key events
license_key_createdfires when a new license key gets generated for a buyer. Your site stores it and shows it to the customer in their order details.license_key_updatedfires when a key is modified (activation count changes, status changes, etc.).
If you skip any of these 14, the corresponding feature just silently doesn’t work. No error message, no warning. Things break and you spend hours figuring out why. The plugin avoids this by registering all 14 automatically.
If you want the full picture of how license keys flow through the system, see our Software License Management for WordPress guide. For subscriptions, the Sell Subscriptions on WordPress Without WooCommerce Subscriptions post breaks down which subscription events handle what.
How webhook security actually works
Webhooks are public URLs. Anyone who finds your webhook URL could send fake POST requests to it pretending to be Lemon Squeezy. So how do you know a webhook is really from LS and not from someone trying to fake an order?
Signature validation. Here’s the simple version:
- When you create the webhook, you (or the plugin) generate a shared secret string.
- LS stores this secret on their side.
- Every time LS sends you a webhook, they hash the request body using that secret and put the result in a header called
X-Signature. - Your site recomputes the same hash using the same secret and the same request body.
- If the hashes match, the request is real. If not, reject it.
The hash uses HMAC SHA256, which is the same standard Stripe, GitHub, and most other webhook providers use. The plugin uses hash_equals() for the comparison, which is a timing-safe comparison so an attacker can’t guess the secret by measuring how long the check takes.
Three headers LS sends with every webhook:
Content-Type: application/json(the payload is JSON)X-Event-Name: order_created(or whichever event fired)X-Signature: <the hash>(proves it’s really LS)
The plugin handles signature validation on every incoming webhook automatically. If you build your own integration, you have to write this yourself, and it’s the #1 place people get hacked.
The manual setup process (the painful version)
If you want to set this up without our plugin, here are the 8 steps:
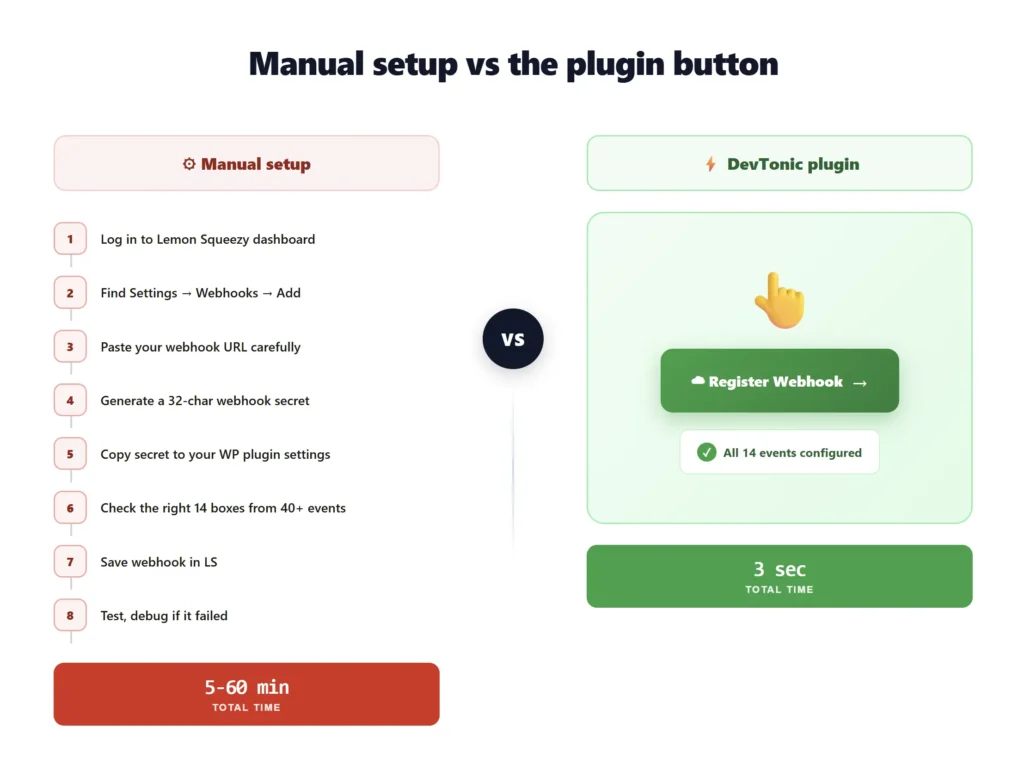
- Log in to your Lemon Squeezy dashboard
- Go to Settings → Webhooks → Add webhook
- Paste your webhook URL:
https://yoursite.com/wp-json/wcls/v1/webhook(one typo here silently breaks everything) - Click “Generate” to create a webhook secret, or paste your own (must be at least 32 random characters for security)
- Copy that secret
- Open another tab to your WordPress admin, go to your plugin or custom code’s settings, paste the secret in the matching field, save
- Switch back to LS. Scroll through the list of 40+ available events and check the boxes for the 14 your store needs (if you miss one, that feature just doesn’t work)
- Save the webhook in LS. Then test it by either simulating an event from the dashboard or making a test purchase.
If you got everything right on the first try, 5-10 minutes. If you didn’t (URL typo, secret mismatch, missed events, HTTPS issue), it can take an hour of debugging.
The one-click alternative
Here’s what the plugin does instead.
In your WordPress admin, go to WooCommerce → Settings → Payments → Lemon Squeezy → Settings. Scroll to the Webhook Configuration section. You’ll see a button labeled Register Webhook on Lemon Squeezy.
Click it.
Done.
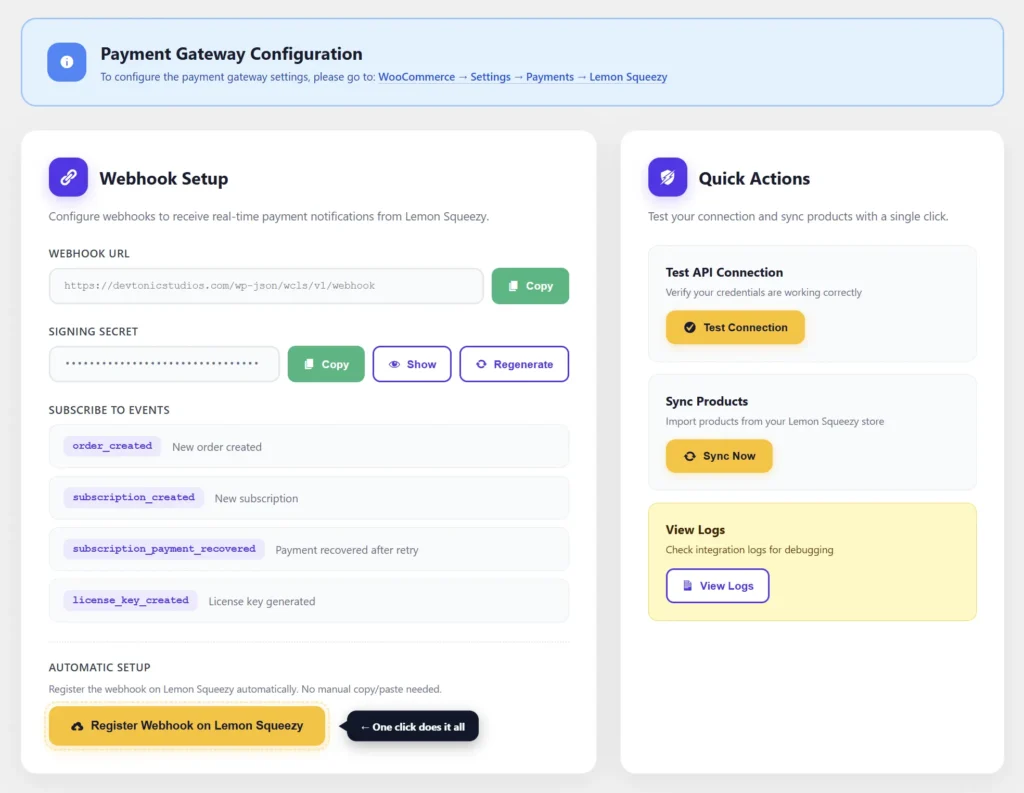
In about 3 seconds, the plugin:
- Generates a 32-byte cryptographically secure webhook secret (if you don’t already have one)
- Constructs the correct webhook URL for your site
- Confirms your site is on HTTPS (refuses to proceed if not)
- Calls the LS API and creates the webhook with all 14 events pre-checked
- Stores the webhook ID returned by LS in your plugin settings
- Logs the result and shows you a success or error message in the admin
No copy-pasting. No tab switching. No checkbox checklist. No “did I get the secret right in both places?” anxiety. The plugin is $39/year or $79 lifetime via the Lemon Squeezy for WooCommerce product page.
For the full setup walkthrough (covering API credentials, products, and the rest), see our Lemon Squeezy WordPress plugin setup guide.
Common errors and how to fix them
These are the issues I see people hit most often.
Signature validation failures. Every webhook gets rejected with an error like “invalid signature.” The secret in LS doesn’t match the secret in your WP plugin. Regenerate it on both sides, making sure they’re identical, then save. Or just use the plugin’s one-click button which keeps both in sync automatically.
Webhook never arrives. LS dashboard shows the webhook fired but your site has no log of receiving it. Usually one of two things. Cloudflare or your hosting firewall is silently blocking the LS request. This is more common than you’d think, especially with Cloudflare’s Bot Fight Mode. Whitelist the /wp-json/wcls/v1/webhook path or turn off Bot Fight Mode for that route. LS doesn’t publish their delivery IPs, so don’t try to IP-whitelist. Signature validation is your security layer.
Events don’t fire. Webhook arrives, but the feature you expected doesn’t happen. You probably forgot to enable that specific event in the LS dashboard. Each of the 14 events must be checked individually. Re-open the webhook in LS, scroll through the event list, make sure everything you need is checked.
Localhost doesn’t work. You’re testing on a local dev environment and LS can’t reach your site. Of course. LS lives on the public internet. Solutions: ngrok, Cloudflare Tunnel, or Localwp’s built-in “Live Link” feature. All three expose a public HTTPS URL that tunnels to your local site.
Timeout errors. LS marks webhooks as failed because your site takes longer than 15 seconds to respond with HTTP 200. Move heavy processing to a background queue. Return 200 immediately, then process the data after. The plugin already does this for you.
How to test webhooks before going live
Two ways:
Test mode. Switch your LS store to test mode. Set up a separate webhook for test mode (LS keeps test and live webhooks completely separate). Make a fake purchase using a test card. Watch the webhook fire and check that your WordPress site processed it correctly.
Simulate from the dashboard. Go to Settings → Webhooks in LS, click into your webhook, and use the “Simulate” feature. LS lets you fire any event type at your endpoint without needing a real transaction. Faster for development.
Both methods work. I use simulate during initial setup and test mode for end-to-end testing before going live.
What the plugin handles vs what’s still on you
To make this completely clear:
The plugin handles automatically:
- Webhook URL configuration
- Webhook secret generation (32-byte cryptographic random)
- HTTPS validation before registration
- Registering all 14 events with LS in one call
- Signature validation on every incoming webhook
- Order status updates from webhooks
- License key generation and storage
- Subscription state sync
- Dunning recovery via the
subscription_payment_recoveredevent - Error logging
You still handle:
- Hosting your site on HTTPS (a Let’s Encrypt cert from your host is enough)
- Initial plugin API credentials (your LS API key and store ID, one-time setup)
- Re-registering the webhook if you move LS stores or change your domain
- Setting up products in LS and mapping them to your WP store
The split is intentional. The plugin handles the technical glue. You handle the business setup that only you can do.
Questions people actually ask me
What’s the webhook URL for my WordPress site?
With our plugin, it’s always https://yoursite.com/wp-json/wcls/v1/webhook. If you built your own integration, you choose your own URL.
Do I need to do anything special on my server?
Just HTTPS. Almost every hosting provider gives you a free Let’s Encrypt certificate now. If your site loads with a green padlock in the browser, you’re good.
What happens if a webhook fails to deliver?
LS retries up to 3 more times using exponential backoff: 5 seconds, then 25 seconds, then 125 seconds. After 4 total attempts, it stops trying. You can manually re-send any recent webhook from the LS dashboard.
Can I test webhooks without making real purchases?
Yes. LS lets you simulate any webhook event from the dashboard with one click, no real transaction needed. Or you can flip your store to test mode and use a test card.
Why isn’t my webhook firing?
If LS says it sent the webhook but your site has no record of receiving it, almost always your hosting firewall or Cloudflare is blocking it. Check Cloudflare’s Bot Fight Mode and Security Events log. Otherwise, check that your site is actually on HTTPS, your URL has no typos, and the events you need are checked in LS.
Do I need separate webhooks for test mode and live mode?
Yes. LS keeps test and live mode webhooks completely separate. Set up one for each, ideally pointing at the same endpoint but with different secrets.
Can I have multiple webhook endpoints?
You can. LS supports as many webhooks as you want per store. Useful if you want to send certain events to different systems, like one webhook to your WordPress site and another to a Slack bot for notifications.
What if I’m not using your plugin?
You can absolutely build your own integration. The article above shows the manual setup. The 14 events are still the right starting point. Just know that you’re taking on signature validation, error handling, retry logic, and all the edge cases yourself. For most WordPress sellers, the plugin saves enough time to pay for itself in the first week.
Putting it all together
Webhooks are the link between Lemon Squeezy and your WordPress site. Without them, nothing happens after the customer pays. With them set up correctly, everything happens automatically.
You can configure them manually if you want to understand every piece. 8 steps, 5-10 minutes if you don’t hit any of the gotchas, longer if you do. Or you can click the Register Webhook on Lemon Squeezy button in our plugin and have it done in 3 seconds.
Both paths get you to the same place. One just respects your time more than the other.
If you’re ready to set up your store, the Lemon Squeezy WordPress plugin setup guide walks through every step from API credentials to your first sale. For the full feature list of the plugin, see the Lemon Squeezy for WooCommerce plugin page or the product page if you want to buy it. Technical reference for hooks, filters, and advanced setups is in the full plugin documentation.
Related resources on devtonicstudios.com
Plugin pages:
- Lemon Squeezy for WooCommerce plugin page, overview, features, pricing
- Plugin product page, buy the plugin ($39/year or $79 lifetime)
- Full plugin documentation, technical reference, hooks, filters
Related blog guides:
- Lemon Squeezy WordPress plugin setup guide, full step-by-step setup
- Software License Management for WordPress, sell software with auto-generated license keys
- How to Sell Digital Products on WordPress, the complete digital seller stack
- Merchant of Record for WordPress, what MOR is and why WordPress sellers benefit
- Lemon Squeezy vs Stripe on WordPress, honest comparison
- Is Lemon Squeezy Still Safe After Stripe Acquisition?, current status report
- Lemon Squeezy Fees Explained, complete fee breakdown
Sources used to verify every detail in this article:
- Lemon Squeezy official webhooks documentation
- Lemon Squeezy webhook event types
- Lemon Squeezy webhook requests reference
- Lemon Squeezy webhook signature signing requests
- Lemon Squeezy webhook example payloads
- Lemon Squeezy simulate webhook events
- Lemon Squeezy passing custom data at checkout
- Lemon Squeezy create webhook API reference